solar oven bread
Imagine the power’s been out for days, but the aroma of fresh-baked bread still fills your home. That’s not a fantasy—it’s a skill you can master today before you actually need it.
Most preparedness experts focus on stockpiling freeze-dried meals and energy bars, but they’re missing the psychological comfort that comes from maintaining normalcy during disruption. Nothing says “we’re going to be okay” like warm bread on the table, even when the world outside has gone sideways.
Traditional bread-making wisdom doesn’t serve you in a grid-down situation. You need methods that work without electric mixers, digital thermometers, or conventional ovens. The good news? These older techniques often produce superior results with minimal equipment.
Let’s start with the foundation—a no-knead dough that requires nothing but flour, water, salt, and a tiny amount of yeast (or your own sourdough starter if you’re thinking truly long-term). The secret isn’t in special ingredients but in time—letting the dough develop naturally over 12-24 hours eliminates the need for laborious kneading. One batch can be stretched to create multiple days’ worth of bread with proper storage between bakes.
Your cooking vessels become critical when conventional options disappear. The humble Dutch oven transforms into your most versatile baking tool—its heavy cast iron construction creates a sealed environment that traps steam, producing that coveted crispy crust. Position it in coals (not flames) with additional coals on the lid for even cooking from all sides. The temperature sweet spot? When you can hold your hand above the coals for a 4-count before needing to pull away.
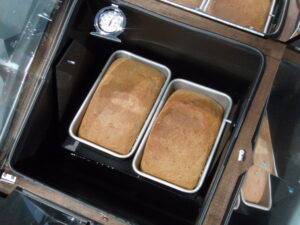
Solar ovens provide another ingenious solution, working even in winter if positioned correctly. The key difference between mediocre and excellent solar baking? Temperature management through proper alignment and insulation. Use dark, thin-walled baking pans that absorb heat efficiently, and position your dough lower in the solar oven than you might expect—heat rises, and the upper portion often overheats while the bottom remains doughy.
For truly primitive conditions, pit cooking creates surprisingly consistent results. Dig a hole approximately 18 inches deep, line with rocks, and build a fire to heat them thoroughly. Once the flames die down, place your dough (protected in a covered pot) among the hot rocks and cover everything with dirt. The residual heat creates a natural oven that maintains temperature for hours—perfect for overnight baking while conserving fuel.
Speaking of fuel efficiency—master the art of sequential cooking. Begin with flatbreads on a preheated stone or pan while your larger loaf chamber comes to temperature. As heat diminishes, transition to quick breads and crackers that require less intense heat. One firing sequence can produce three different baked goods if properly planned.
The preservative nature of sourdough becomes particularly valuable in situations without refrigeration. A properly maintained sourdough starter contains beneficial bacteria that naturally extends the shelf life of your bread by several days compared to commercial yeast varieties. Maintain your starter by feeding it regularly with small amounts of flour and water—even in cool conditions, it remains viable with minimal care.
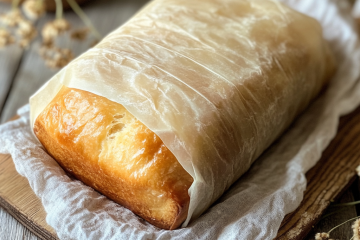
Proper storage becomes crucial without modern packaging. Learn to create beeswax wraps from cotton cloth and local beeswax, providing a reusable, breathable covering that prevents mold while allowing natural respiration that plastic suffocates. For longer storage, consider traditional bread boxes lined with linen, which maintain the perfect humidity balance.
Remember that successful emergency baking requires practice during normal times. Each of these methods has a learning curve that’s best mastered while you still have the luxury of failure. The ancient art of bread-making has sustained civilizations through their darkest hours—add this timeless skill to your preparedness arsenal and you’ll never truly go hungry.
Here’s a simple, no-fuss, no-knead bread recipe that’s pantry-friendly, forgiving, and—dare I say—rivaling anything you’d barter three goats for in a post-apocalyptic farmer’s market.
The “Lazy Genius” No-Knead Bread Recipe (a.k.a. Bread for People Who Hate Kneading)
Ingredients:
-
3 cups all-purpose flour (or bread flour if you’ve got it)
-
1 ½ teaspoons salt
-
½ teaspoon dry active yeast (yes, just a pinch—this recipe is slower than a snail on a caffeine detox)
-
1 ½ cups warm water (not lava hot, just cozy bath warm)
Directions:
-
Mix it like you mean it (but gently):
In a large bowl, combine flour, salt, and yeast. Stir in warm water until it’s a shaggy, sticky mess. Don’t overthink it—it should look like something a toddler made in art class. -
Cover and ignore:
Cover the bowl with plastic wrap, a plate, or even a clean towel (because we’re not picky here), and let it rest at room temperature for 12 to 18 hours.
Yup. You read that right. This dough gets more beauty sleep than your Aunt Margie before church. -
Get your Dutch oven hot ‘n ready:
About 30 minutes before baking, place a Dutch oven (or heavy pot with a lid) in the oven and preheat it to 450°F. That’s not a typo. We’re going full dragon’s breath here. -
Shape it (kinda):
Meanwhile, flour your hands and a surface, and gently scoop that jiggly blob out. Fold it a couple of times like you’re tucking in a cranky toddler. No kneading—just a few folds. Let it rest while the oven heats. -
Bake it like you’re showing off:
Carefully remove the hot Dutch oven, plop the dough inside (parchment paper helps), cover it with the lid, and bake for 30 minutes. Then remove the lid and bake for another 10–15 minutes until it’s golden, crispy, and makes you feel like a pioneer Instagram influencer. -
Cool your jets:
Let it cool on a rack for at least 30 minutes before slicing. Yes, I know it smells amazing. Yes, you must wait. It’s the law of gluten.

2 Comments
Susie · April 7, 2025 at 6:13 pm
is this a book?
Preparedness Pro · April 8, 2025 at 11:10 am
Nope, just some helpful hints and recipe right here.