Organizing all of my supplies is probably the biggest focus of my life lately. I just have to have space for everything, everything in order, know what I have, and be able to rotate things well. I also tend not to do projects that are viable and worthy of my time if I have to work too hard to find and gather all of the supplies I need and then have to hassle to get them all put away too. In other words, I’m much more functional in a clean and organized environment. But my kitchen isn’t exactly up to par where that’s concerned. I’ve got a minimal amount of counter space and cupboard space and so I’ve take up room in the kitchen with mismatched pieces of furniture and such that I’ve accumulated over the years I was single in an effort to try and make things work as well as possible. As I’ve been working on my cookbook I’ve been spending a lot of time in the kitchen and it’s been very obvious that I don’t have things organize like I need them. I’ve been bringing tons of stuff up from the pantries and just stacking them up and up and I try to make everything handy for the stuff I’m cooking. Ahhhh! But the good news is that last month I was able to find a great solution that allowed me to be more organized in the kitchen and have all of my grains, flavorings and such readily accessible to use whenever I want. I hope that some of the ideas I share with you might be useful to you too.
On a particular anniversary, I had asked my former hubby for a new food processor because the one I have from the early 80’s has about had it. (And I can always justify having a food processor because it will still run in the midst of a power outage thanks to my little Roadrunner Humless Solar Generator. *grin* Remember, I am, after all, the laziest prepper on the planet.) So off we went to Costco to look to see what they had. I looked, I loved, and then something said “just look around some more.” So I did. Just as we were passing around a corner over in the auto supplies section of the store, something caught my eye. It was brushed stainless steel like you would see in a professional kitchen, with lots of drawers, and a deep cabinet and it was topped with a beautiful maple colored butcher block on the top. It was long and sleek, and narrow enough to replace a problematic part of my kitchen while still giving me more storage space. (The plague of every culinary crazy, right?) The Kitchen Gadget Geek in me completely ignored the fact that this was supposed to be a tool bench for the garage. It was just too pretty for that.
Without even having to express to my former hubby why I loved it so much, he totally caught the vision in only a couple seconds after I started drooling over the possibilities. Here’s the best part…it was marked way down because it had been “used” (aka purchased, assembled, tried out, and then returned). But it was still in mint/new condition. If I had purchased something like this that was designed specifically for the kitchen, it could have looked exactly like this with the butcher block top and the brushed stainless steel, but because it would have been for the kitchen, it would have cost a couple grand–easy! But I only had to pay an enth of that! This was definitely a moment deserving of the Happy Dance.
Here’s the “Before” picture–you can see just how awful this space was as it just seems to beg to get more and more cluttered as I brought more and more things into the kitchen from the pantry. Ugh!
Here’s the “After” picture. Now this is one bright, shiny object I don’t mind distracting me! (by the way, these are still at Costco. The regular price for them is $540–but hey, maybe you’ll get lucky to and find a great deal on a returned one.)
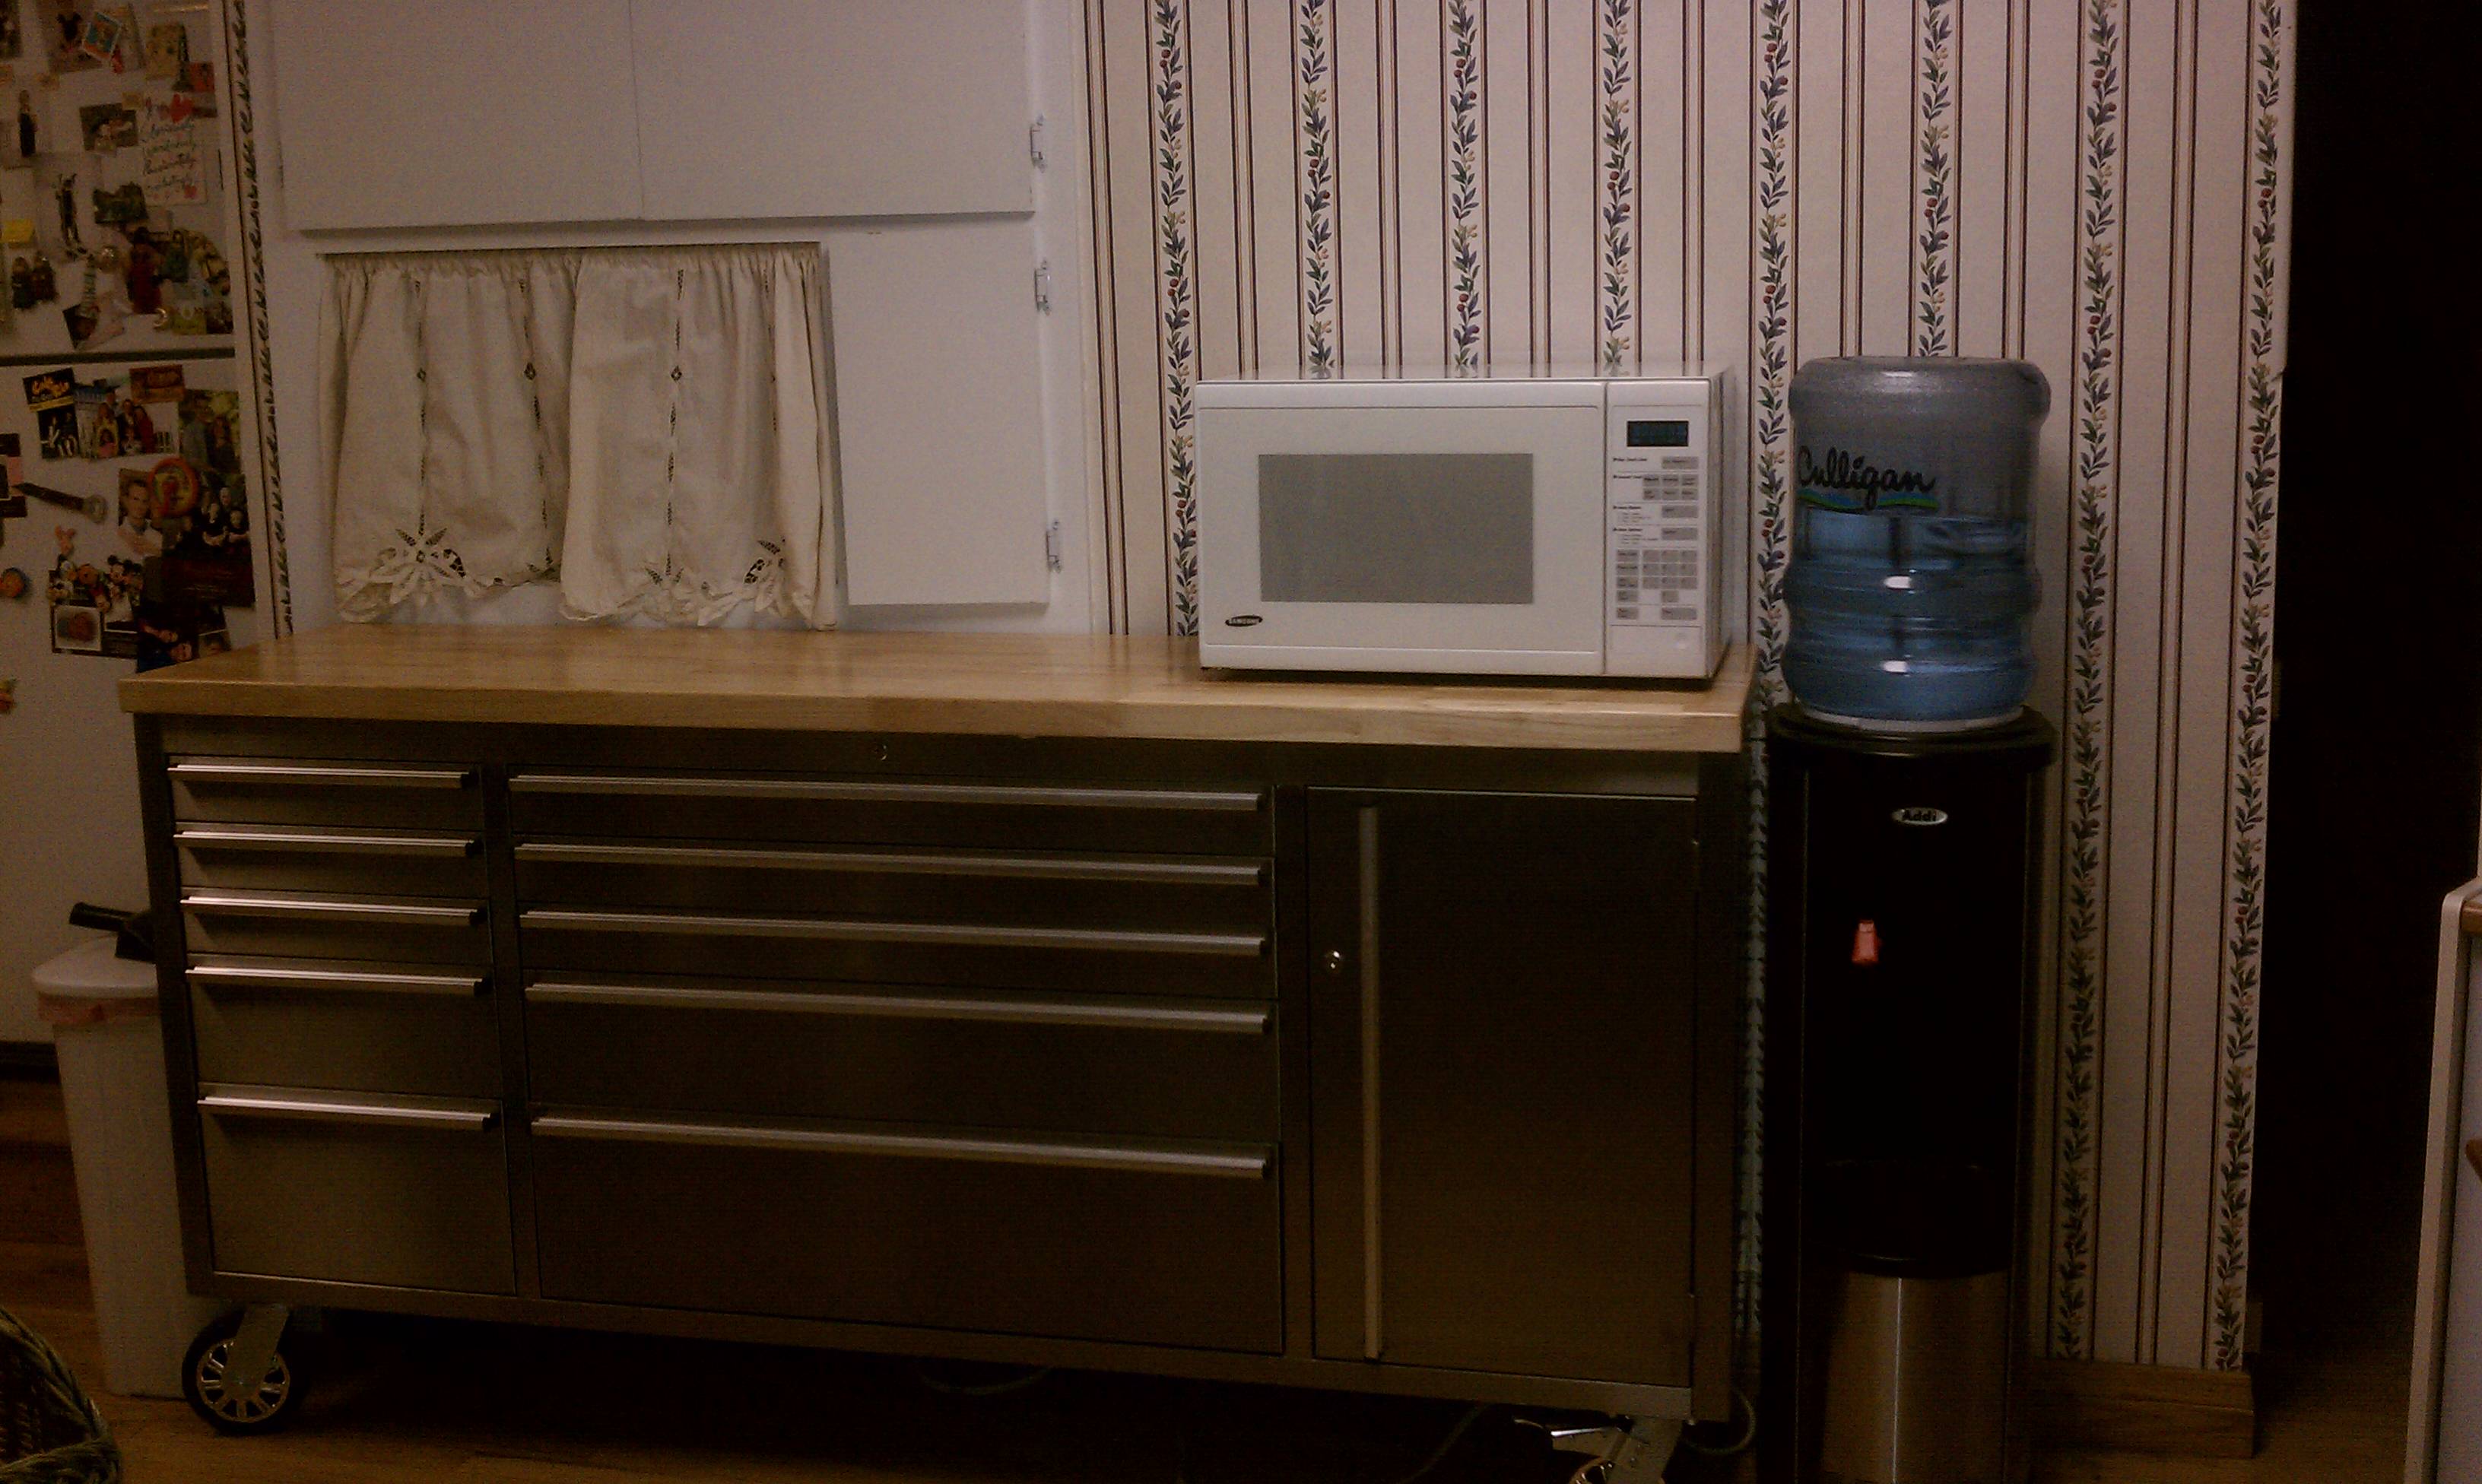 “After” Garage Bench as a Great Kitchen Piece
Copyright 2012 Preparedness Pro
Here’s the proverbial “OCD drawer”–all of my cooking (as opposed to baking) spices alphabetized. 🙂

Moving in this piece of fabulous equipment required me to go through all of my cupboards; cleaning them out; and then getting them reorganized. That’s one project that I really didn’t mind doing. In fact, I was so EXCITED at the possibilities that this new-found organization would afford me.
Since I was already practically redoing everything in the kitchen anyway, I finally got around to putting small amounts of my favorite grains in the clear P.E.T. containers and labeling them. It allows the items to last SO much longer and makes it so that I don’t have to go down to the pantry and lug up a 5 gallon bucket every time I want to make something with it all. It also ensures that dry goods will stay fresher longer.  So many of the things we buy nowadays come in those cardboard boxes with the flimsy bags inside. I discovered a long time ago that the P.E.T. containers are great for keeping dry cereals instead of keeping them in the manufacturer’s packaging. As long as I use the P.E.T. containers, I can keep everything organized AND fresh much longer than the manufacturer’s packaging! It also works much better for those times when I might purchase the dry items in bulk, even the Cheerios at Costco, but don’t want the bulk in my kitchen–who has room for that anyway? (Is it just me or does anyone else have a problem neatly stacking those big bags of cereal?) Plus, I don’t know about you, but haven’t you noticed that those cereal boxes take up SO much room in the cupboards? They seem to just be getting bigger with less in them nowadays. Don’t get me started on those big, awkward bags of dry pet food! Ugh! What an eyesore amidst an otherwise clean kitchen! But now I can just take my large P.E.T. jars and fill them up with dry dog or cat food and put the rest in the bigger buckets and keep them down in the cool, dry storage space. This ensures that the dry pet foods stay fresher longer, doesn’t attract mites or mice AND gives me the opportunity to put the food-grade diatomaceous earth right in the food at this point instead of trying to remember to give the animals the DE once a day. (And of course the DE ensures that no little insects make themselves at home in the food either.) Using something that’s square, tight, and that keeps things good longer like the P.E.T. containers just makes good sense.
I also loathe it when I’ve been using a #10 can of something, such as strawberries, only to find that once I’ve opened it  and used it, it’s still taking up as much room as when it’s full. So with these P.E.T. bottles, I can put the remaining ingredients of open #10 cans and take up less storage space without compromising the taste, texture and nutrition. Once you open a #10 can of freeze-dried product, you should have about 18 months before you’ve compromised taste, texture, and nutrition. The good news though is that I’ve discovered that the same is true when I transfer the ingredients from the #10 can over to the P.E.T. containers.
Thanks to this little project, I now have all of my cupboards organized and everything that I use regularly (which is just about everything I have on hand) accessible in its original packaging or in the appropriate size of P.E.T. containers. And they’re all labeled. (And, yes, I confess, that I did alphabetize all of my seasonings, cooking herbs, and baking flavorings.) HEAVEN!
The added bonus of this bench is that it is on wheels. One of the problems I’ve had in making my YouTube videos is how my kitchen’s set up. Any time I’m at the stove the camera has to come to the side of me, or look over the shoulder, or get my back side. Meh. But since this work bench has wheels on it, I can turn it around any time I want to make an instructional video AND have a whole heck of a lot of my favorite tools and ingredients handy to boot! So now I have NO excuses not to get more of these done! Yay!
 I also have it set up so that any time I bring any groceries home I can simply pull out my FoodSaver and take care of the dry goods right then and there instead of having it feel like more of a big deal kind of production. The other day I brought home 50 pounds of raw pecans. All I had to do was grab the FoodSaver and my Mason jars and fill them up with the nuts and suck the oxygen out. I was done with the whole project from the time I got home to putting the jars away in less than 15 minutes. Yeah, I’ll pay 15 minutes to ensure that I can preserve my pricey pecans for 5 to 8 years. No problem. Again…Heaven! Who knew that organization could actually save me so much money? I suspect that it can save you money too so try out some of these ideas. (By the way, the picture to the left is of Panko crumbs–which I use in a lot of recipes; but since they are so fine I can’t just FoodSaver them directly or they could clog up the tubing. So I measure them out in 1 cup increments–since most recipes call for 1 cup–put them in individual baggies, and then use the FoodSaver to seal them oxygen free to maintain freshness.)
I officially declare this National Prepping Organization Month! So…Happy Organizing *grin*!
(If you’re looking for more information on any of these methods, just put the term in the search bar above with the use of quotation marks.)


42 Comments
Lynn · July 17, 2012 at 7:14 am
Happy Happy Anniversary!!! What a cute couple you make. ; )
LOVE the new “kitchen” storage bench. Gorgeous! And smart. Perfect.
P.S. I have the same white curtains for a little tiny window that you have. ; )
Kellene Bishop · July 17, 2012 at 7:25 am
The curtains actually cover up a cupboard that’s really deep but doesn’t have any doors to it. Goodness knows how cluttered a space like that can appear. So I’ve just used those curtains there and on my kitchen window since we first moved into the house.
jacqui · July 17, 2012 at 9:48 am
I agree – I can’t start a new project with bits of the last one hanging around. Your quick system for mason jar storage looks good. My foodsaver didn’t come with a lid for mason jars – any ideas where to get one – I live in NZ so it would need to be a place that does some form of mail order.
Sammye · July 17, 2012 at 12:32 pm
They used to sell the mason jar attachments on Ebay. Might check there, there was one for the regular and wide mouth jars.
Deanna · July 17, 2012 at 1:51 pm
Amazon also sells the jar attachment for both regular and wide mouth jars.
Jamie · July 17, 2012 at 1:53 pm
You can get the mason jar attachments on ebay, the foodsaver website or amazon
Ruth Beetow · July 19, 2012 at 2:53 pm
I bought both large and small Mason jar vacume seal attachments for $7 and $9 right on the Food Saver website.
Donnella · July 17, 2012 at 12:26 pm
Great idea on the garage bench. I’m going to look for one today.
Lee · July 17, 2012 at 12:45 pm
Love that you think outside the box Kellene. Sam’s have a similar storage system in their Auto section too for $100.00. (So glad to know I’m not the only one who needs everything to have a place and be in it’s place!!)
Debbie Cleveland · July 17, 2012 at 1:12 pm
Excellent article! So happy for you! I shut down in disorder! So I totally get where you are coming from! I’m pretty organized…just need to get down to actually catalogueing what I have since I have stuff STUFFED everywhere!
Deanna · July 17, 2012 at 1:57 pm
I’v been using the Food Saver jar attachment for years!! I love it. I dehydrate my own garden veggies and herbs and put them in the mason jars with an oxygen absorber, and suck out the air.
They last for years, and with the jars on the shelf, it’s easy to see what you have.
Carrie · July 17, 2012 at 2:30 pm
What a beautiful bench! You are inspiring me to tackle my kitchen mess! Where do you get the PET containers?
crisco · July 17, 2012 at 3:20 pm
I used to think I was the only one whose home looked less that perfect. I love organization, but you’d never know it by it’s appearance. My biggest embarasment is when a neighbor walks in a finds me doing 10 things at once. It may be mass confusion to them..total chaos..an exposion of “stuff”, but I generally find the countertop by the end of the evening. Maybe it’s A.D.D. It seems my brain is outpacing my time these days. Love your new storage unit. Saw one similar at Habor Freight and was jealous of guys haveing all the cool storgae units for their garage. Your thinking outside the box….love it.
Monica · July 17, 2012 at 4:44 pm
Just yesterday, I ordered one from Ebay. It was the regular and wide mouth and the vacuum hose for $33.99
Connie · July 17, 2012 at 5:55 pm
I bought a Food Saver last year so I could pack dehydrated stuff into bags and also suck the air out of my jars of dehydrated food. (Previously, I was using a Pump-N-Seal from Pioneer which works fine but is a lot of work.) This year I bought the standard and wide-mouth Food Saver adaptors to use with my canning jars (foodsaver.com) but I have a ton of random-sized jars to fill first. This week I tried to buy a Food Saver cannister so I could put my random-sized jars into it for sucking the air out–but they’re out of stock. I decided to read the reviews and discovered that they crack after only a little time, so that’s not going to happen. Maybe that’s why they’re out of stock! Thinking about it, I realized that I could use a wide-mouth canning jar to do the same thing–but only for small jars.
So, question. Anybody have ANY ideas how to McGyver a means of using the Food Saver to suck the oxygen of larger non-canning jars??? I have lots of them, and don’t want to Pump-N-Seal them again!
Kellene Bishop · July 17, 2012 at 6:32 pm
you can put the random sized jars inside on of the FoodSaver sealing canisters and seal the jars that way (if they’ll fit) Unfortunately, the Pump and Seal won’t keep it’s seal for very long. I’d suggest going back and checking the ones you did previously. I was reading a research study they did on the shelf life of the Pioneer brand and the FoodSaver hand pump too.
Sarah Colvill · July 17, 2012 at 6:18 pm
When I was in the ministry, one of the parsonages that we lived in had a huge kitchen, but it only had cabinets and storage space on one small wall. And the sink and dishwasher were included in that small space. My dad liked to build furniture so he built me a big cabinet that doubled my storage and counter space. He also made it portable so I could take it with me when I moved again. (Wish he had thought to put wheels on it. Maybe I’ll have Marty do it for me.) Where we live now it still serves as storage and counter space, but it is also in an area of the kitchen where I can pull it out and use it as a buffet in the center of the room when we have large gatherings of friends and family. We put the food and dishes on it and people go down both sides of it. As for the PET containers, I use those in the truck. Marty and I like almonds and cashews for our snacks. I buy them in large bags at our local Cash and Carry store and dump them into the large PET containers. It makes it easy for us to keep our snacks fresh and handy.
Kellene Bishop · July 17, 2012 at 6:33 pm
I’ve linked to various options that Five Star Preparedness has with the PET Containers throughout the article, where ever I mention the PET containers.
Sakura · July 17, 2012 at 6:36 pm
Wow what a difference that made! I have enjoyed your website since I first saw you on TV. I refer to you as the crazy egg lady to my friends. I still haven’t tried it, my kids have begged me not to. They have offered to keep me in fresh eggs until I die as long as I don’t try your method. I really like your practical approach to prepping, it’s very doable. I don’t know if I would call myself a prepper, but I am building a food and water storage. My family is sort of onboard, but I will tell you when we lost power for 3 days in december (we live in bountiful) it was sure nice to have food, water, lighting, wifi and games to play. I’m learning something new every time I explore your website. Thanks for all the encouragement and keep up the great work. I look forward to your new cookbook your working on.
Kellene Bishop · July 17, 2012 at 6:37 pm
FoodSaver itself offers them, but I agree with the others…e-bay or Amazon. Good luck!!!
Faith D. · July 17, 2012 at 8:10 pm
Cabellas and Bass Pro have the Foodsaver mason jar attachmentsfor regular and wide mouth, I paid 10.00 for each. The hose came with my Foodsaver. Great way to put up dry foods!
Sherry · July 17, 2012 at 8:35 pm
Happy Anniversary! Great ideas…thanks! Books are valuable resourses also to have in our preparedness.I like reading all your wonderful prepardness articles. Thank-You!
Allison · July 17, 2012 at 10:51 pm
I looked on the Five Star Preparedness website to find more info on the PET containers but couldn’t find the dimensions. We live in an old house with “unique” sized shelves and cupboards and it’s hard to figure out the best way to maximize the space when it comes to storage containers. Is there anyway you could give me the measurements of the ones that you have and then I can see if I could stack them. We are having a really big problem with weevils and I need to put everything in new containers. Thanks
Kellene Bishop · July 17, 2012 at 10:59 pm
I’d suggest sending them an e-mail. They’ll be responsive, I’m sure.
Kellene Bishop · July 17, 2012 at 11:00 pm
by the way, wheat has weevils in it no matter what. This is where you need to add food-grade diatomaceous earth to your dry grains.
Janet · July 18, 2012 at 12:43 am
I know this article was meant to be about organization. But the part that really got me excited was hearing that you’re working on your cookbook. I am really looking forward to that book coming out!
Kellene Bishop · July 18, 2012 at 12:48 am
*grin*
Martha P · July 18, 2012 at 1:54 am
You can also seal things like panko crumb, coffee, or other “crumbly” things in jars with the food saver by putting a coffee filter over the contents before vacuum sealing, rather than using a baggie.
Kathleen · July 18, 2012 at 2:38 am
I like that, but I think it would be a great quilting cupboard too! Nice job, Happy Anniversary. Did you ever get a new food processor? I love my Cuisinart.
Kellene Bishop · July 18, 2012 at 2:41 am
Nah, I’ll wait on the food processor. It’s lasted this long, it can hang on a little longer. 🙂
Anne · July 18, 2012 at 5:00 am
Congratulations!!
This sounds great! Do you have a food saver video on your site?
Lauri · July 18, 2012 at 5:04 am
Happy Anniversary!!!!! Looking forward to your cookbook. Thank you, for all your hard work and inputs.
Kellene Bishop · July 18, 2012 at 5:05 am
Hmmm…I know I’ve made one.I’ll have to ask my IT guy where it is. 🙂
The Concrete Fairy · July 18, 2012 at 1:31 pm
Great timing on this article, I’m working on reorganizing all of my storage areas. I’m on a VERY low budget and have to work with what I can scrounge up, I’m going to put energy into looking for a tool cabinet, that’s an excellent idea! I put a lot of my storage space furniture on wheels, makes the area more versatile. My main pantry is also a safe room and has been a guest room, I just rearrange the dressers and shelving units to suit the current need. I can also shove them all back into a corner and still be able to access the contents later. I hang sturdy shelves from the ceiling to use the high spaces efficiently, and my rolling furniture tucks in under them.
Thanks for great ideas Kellene! At this point I have kefir grains making kefir, (I used them to make bread and sauerkraut!), unrefrigerated eggs, waxed cheese, and a Food Saver I use on mason jars, all ideas I have gotten from you 🙂
Kellene Bishop · July 18, 2012 at 8:46 pm
My husband is always a big proponent of people looking UP to solve their storage dilemmas. Way to go!
Alesia · July 18, 2012 at 6:03 pm
Happy Anniversary!! My first time on your site – it is great. I am a semi-newbie to prepping and working on canning and storage of food and water. Are the P.E.T. containers you mentioned plastic or glass? They would be perfect for some of our snack foods I want to store for awhile.
The link gave the price but didn’t say. Thanks!
Kellene Bishop · July 18, 2012 at 8:41 pm
P.E.T. containers are plastic.
lilly merx · July 18, 2012 at 7:43 pm
Happy anniversary dear… You and your hubby keep up the good work.
atasteofcreole · July 31, 2012 at 3:42 am
How do you know the nuts last 5-8 years? Just curious. Hubby scored 40# of walnut pieces and while I toasted several pints, they are VERY dry!! I would LOVE to save some for snacking!
Kellene Bishop · July 31, 2012 at 3:45 am
because I eat what I have…everything gets rotated…everything gets used.
atasteofcreole · August 4, 2012 at 4:50 am
ahh
RavenSpeaks · August 7, 2012 at 5:32 am
Very awesome. Congratulations to you!
Comments are closed.