
Homemade Parmesan Cheese
Well, at least those of us who are addicted to cheese anyway.
- Can you name at least 10 different kinds of cheese that you love?
- Do you believe that cheese should be its own food group?
- Are you helpless to abide by your diet unless it involves huge amounts of melted cheese?
Then this article is for you! Grant it, it’s a simplification of things, but it should give you blissful, melted gooey hope!
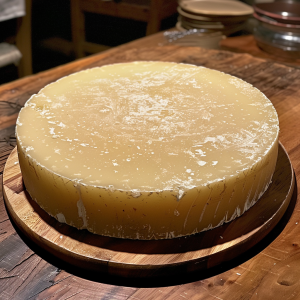
So, picture this. It’s a bona fide emergency survival situation. You are holed up on your home and living off of the emergency preparedness supplies you stored. And you’ve got one heck of a hankering for some yummy melted cheese. But you’re just not in the mood for the Velveeta, that nasty powdered stuff, or the “squirt” kind of cheese. You want a good solid bite of a yummy Parmesan, or Swiss, or a sharp cheddar. (I’m making myself drool even as I write this.) But hey, cheese doesn’t store for a very long time, right? Well, in this case, I’m happy to tell you that you’re wrong. And if you’re a true cheese addict, then you’ll be happy to hear that you’re wrong for once, right?
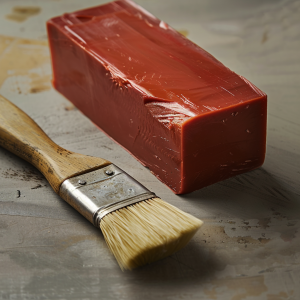
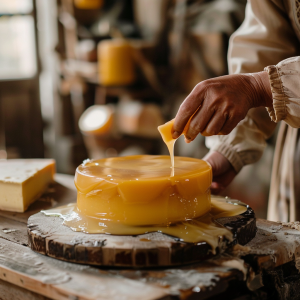
So here’s the good news. You CAN have your favorite cheese on hand, even in an emergency, and even though no stores are open and you have no access to electricity. All you have to do is buy the hard blocks of cheese that you want now in order to have them stored for up to the next 2-5 years. Cheese wax prevents your cheese from developing mold or bacteria and it keeps the moisture in. Simply use a combination of dipping and brushing with a natural boar’s hair brush to apply the melted cheese wax liberally to your block of cheese, let it harden, and then, VOILA – you’ve got your wish.
The cheese was should be heated to 225-240 degrees and you want to let it completely cool before applying the 2nd and 3rd coats. Yes, I recommend 3 coats.
Cheese treated with cheese wax will store for up to 2-5 years at a cool and humic temperature. (Just store your cheese in one of those cake carriers from Tupperware with a wet sponge inside, not touching the cheese, to maintain a 75-95% humidity level. Sure, it will continue to age. But it sure won’t get moldy! (And even if it does in parts, you can simply cut off that part, and re-wax over it.) Once you’ve cut into it, make it a clean cut and then go over it with cider vinegar and rewax.
A couple of tips you should know though.
yes you can wax your own cheese
- Don’t use paraffin wax. It tends to crack and it’s brittle. Cheese wax warms slower, is pliable, and heats to a higher temperature and thus plies better to your cheese shapes and sizes. Cheese wax is also less crumbly and you can use less of it than paraffin. Remember, it’s reusable too!
- I have yet to find a hard cheese that I can’t wax. Cheeses like sharp cheddar, parmesan Gouda, and Swiss are ideal.
- You don’t need cheesecloth, but if you desire to use it prior to your wax layers, it may be helpful getting the wax off. I haven’t had any problems without it though.
- It’s best to melt the cheese wax in a double boiler as opposed to direct heat. Any pan you use to melt your cheese wax in will be your designated cheese wax pan. They are impossible to get clean afterwards. So be forewarned. I use the square food pans that you get from the restaurant supply stores.
- The less you handle the cheese with your hands the better. Use food handling gloves.
- Dip the cheese in for about 6 seconds, then bring it out and HOLD it there for about 90 seconds. You want it to completely cool in between layers. Do 3 layers of dipping and then three layer of brushing to get what you couldn’t dip. (Using the natural boar’s hair brush) The reason why you want to use this kind of brush specifically is because other brushes will apply the cheese wax too thick, or with crevices, etc. This kind of brush is perfect for cheese waxing.
- You don’t need to use food-grade labels for your cheese, however, it’s smart to use a label on the outside of your cheese just prior to the last wax layer. That way you don’t have to worry about it falling off. I just use a single layer of cheese wax to put the label on. I can see through the layer of cheese wax. Some people use different colors of cheese wax for each kind of cheese instead of labels, but I like to date my cheeses too.
- The color of cheese wax doesn’t matter. I prefer red, but I also like clear because I can then see if anything is developing under the surface.
- Be sure to check for pockets or crevices that didn’t get sealed. Look for pin pricks as they will become bigger problems later.
- The cheese surface should be clean and dry prior to waxing. I like to go over my surface with cider vinegar and let it dry before waxing.
-
cheese waxing has been around for ages!
Cheese wax can be re-used several times. You can simply wash it in warm water, let it dry and then re-melt it. So when you remove cheese wax from your cheeses, you can simply reheat and reapply the wax. Simply heat the cheese wax to about 225-240 degrees F. This will also ensure that you’re not transferring any bacteria or unnecessary moisture to your new cheese–even when you’re putting it on your cheese which is cooler.
- You do not need to filter the cheese wax after you melt it. So don’t worry about that step.
- Your first coat will have some unevenness to it. Don’t worry. The 2nd and 3rd coat will even it out just fine.
- Cheese will respond to gravity. So using cheesewax vs. paraffin is important as it’s more pliable. I periodically turn my cheese in view of the gravitational pull.
- A 1# blog of cheese wax will do 10-12 2# blocks of cheese if you’re strictly using the brush. But for dipping, which is what I do, you’ll want a 5# block of cheese wax so that you have enough depth.
- Caution: I would not rely on the “cheese wax” that is used on the soft cheese product that you buy as the store as your cheese wax. You have no idea what’s in it.
- Yes, you can use beeswax instead of cheese wax, but it’s more brittle so you’ll want to put in a small amount of vegetable shortening while it’s melting.
- While letting my cheeses dry out before waxing, I place them on what’s called a cheese mat. It just a sushi rolling mat. You can get a couple of them for under $5 on Amazon.
Cheese wax can be found multiple places online or in your local health food stores. (I have been buying mine on Amazon.) You should also have no problem finding a boar bristle brush either.
Once you get the hang of this cheese waxing stuff you can progress to making your own cheese from powdered milk in any flavor you decide! There’s a whole other world out there in making your own cheese and it’s amazing and can be done in under an hour! (And a bit addictive)
Yummy!
Enjoy the recipe below-especially now that you know that cheese isn’t out of the question and it doesn’t have to be the expensive freeze-dried cheese!

Shelf Stable Enchilada Recipe
Kristen’s Cheesy Roughin’ It Enchiladas
1 can of tomato soup
1 can of cream of chicken soup
1 regular sized can of enchilada sauce
2 cups of canned chicken, drained
About 2 cups of your favorite shredded cheese
Make your sauce by combining the soups and the enchilada sauce.
Use enough flour or corn tortillas to line a large baking dish or Dutch oven with your enchiladas (About 12 to 15 depending on how big you stuff them). Be sure to spray your dish with some cooking spray.
Lightly coat the bottom of your tortilla with the sauce. Then add about 2 tablespoons of chicken, according to your desire. Top the chicken with about 2 tablespoons of cheese. Then roll up your tortilla and place seam side down in the dish. Continue until you’ve filled the dish a single layer deep. Once you’re finished, pour the remaining sauce over the top and top with the remaining cheese. Bake at 350 degrees for about 30 minutes until the cheese is completely melted. You can add chopped black olives, black beans, rice, or even green chilies to this recipe as well.
(Please note these are not ALL of the cheese waxing directions which are far too lengthy for a blog article. Should you like to know how to wax your cheese perfectly and without errors that may cause you to have to do it all over again, please use the resource guide available on this site “For the Love of Cheese” as found in the Pre Pro Classes tab of this site. It includes video instruction and detailed written instruction. This way you won’t get discouraged and your waxed cheese will turn out right the first time.)
For more on cheese wax, visit the Cheese Wax Controversy.


190 Comments
JamieA · March 28, 2009 at 4:56 am
awesome post – thanks for all the great information!
JamieA · March 28, 2009 at 4:56 am
awesome post – thanks for all the great information!
Karen · March 30, 2009 at 11:58 am
Okay I love this! It solves a multitude of food storage problems. My question is that the cheese sufficiently coated in wax can last 25 years at cool temperatures, how long will it last at room temperature. Most of our pantries are room temp. I don’t have a basement so I don’t have the benefit of the extra cooling. Can I get a year, or even two years at 75 degrees?
RightWingMom · December 30, 2012 at 6:46 pm
Karen,
You’re question is VERY valid. Many preppers live in the south and don’t have basements or cellars for year round cool storage. My refrigerator is very full. Can waxed cheese be safely stored, long-term, at about 75 degrees (F)?
(i.e. My master bedroom closet on a wire shelf.)
Also, if there’s a grid-down situation, I’d like to know the maximum temperature to safely store my waxed cheese. For most southerners, no power in August means 90+ degrees in our homes.
Karen · March 30, 2009 at 2:07 pm
Has anyone done this and tested the cheeses at later dates. I am wondering how much stronger the cheese tastes as it ages. I would love any information on this that I can get.
Karen · March 30, 2009 at 2:07 pm
Has anyone done this and tested the cheeses at later dates. I am wondering how much stronger the cheese tastes as it ages. I would love any information on this that I can get.
brittty · March 31, 2009 at 3:35 am
I can’t think of anything better than being able to save cheese! Thanks for the link!
brittty · March 31, 2009 at 3:35 am
I can’t think of anything better than being able to save cheese! Thanks for the link!
practicallysisters · March 31, 2009 at 4:00 am
This is a great recipe!! I was literally considering making enchiladas this week! I’m definitely going to have to add it to next weeks menu!!! Thanks!
http://www.practicallysisters.wordpress.com
practicallysisters · March 31, 2009 at 4:00 am
This is a great recipe!! I was literally considering making enchiladas this week! I’m definitely going to have to add it to next weeks menu!!! Thanks!
http://www.practicallysisters.wordpress.com
gourmetmomma · March 31, 2009 at 4:29 pm
wow. what a great idea! i have some doubts about how long the cheese would last in a hurricane situation (multiple days at 90plus temperatures in the house). but… i think i’ll give it a try. thanks.
queenmom · August 21, 2012 at 7:51 pm
did you ever try the cheese wax? I also live in hurricane location and wonder about the temps can’t find much info on storing foods in the south on the coast no root cellars or basements here. Thanks
Kellene Bishop · August 22, 2012 at 12:10 am
Seriously? You must have me confused with some crackpot website. The only cheese you’ll see in my fridge is shredded cheese that I got for a steal of a deal.
Kellene · March 31, 2009 at 4:31 pm
Consider this. Cheesemaking was an art long before refrigeration was ever available. While the sweating of the cheese will be more rapid in room temperatures or a hot and humid environment, the best cheeses in the world have come from similiar environments. Enjoy!
jpodbuild · April 9, 2009 at 3:15 pm
Your “Cheesy Roughin’ It Enchiladas” make me want to “rough it” all the time. Awesome dish.
It is good to see you on the camp-cook forum!
jpodbuild · April 9, 2009 at 3:15 pm
Your “Cheesy Roughin’ It Enchiladas” make me want to “rough it” all the time. Awesome dish.
It is good to see you on the camp-cook forum!
Emily · April 11, 2009 at 8:40 am
This post has opened up a whole new world for me.
My husband and I were just sort of whining about what we would do if some emergency occurred and we couldn’t buy fresh cheese for any length of time. Canned and freeze dried cheeses have their place, but there’s no substitute for the real thing in our household.
I just recently purchased a cheese making book, several pounds of cheese wax and a natural bristle brush to get started on preserving several blocks of cheese in our fridge. Next… making my own!
(I love this site)
Lilly · June 20, 2012 at 1:42 am
Tell me where you got your cheese making book…
Kellene · April 11, 2009 at 8:43 am
Woohoo! Kudos for you Emily!! Another cheese maniac after my own heart!
Kellene · April 11, 2009 at 8:43 am
Woohoo! Kudos for you Emily!! Another cheese maniac after my own heart!
kathy napier · April 25, 2009 at 4:46 pm
Kellene….I would like to try this in Relief Society. would that be okay? And where is the best place in Salt Lake county to get the cheese wax>
kathy napier · April 25, 2009 at 4:46 pm
Kellene….I would like to try this in Relief Society. would that be okay? And where is the best place in Salt Lake county to get the cheese wax>
cheesenbread · May 4, 2009 at 10:25 am
Fantastic information. I also appreciate your comment on my blog: cheesenbread.wordpress.com
I am adding you to my blogroll!
cheesenbread · May 4, 2009 at 10:25 am
Fantastic information. I also appreciate your comment on my blog: cheesenbread.wordpress.com
I am adding you to my blogroll!
Al · June 4, 2009 at 1:10 am
How do you clean the brush after you wax the cheese?
Al · June 4, 2009 at 1:10 am
How do you clean the brush after you wax the cheese?
Kellene · June 4, 2009 at 3:02 am
Good question. I just put it in a small pan of water and let it boil a bit. It melts away and the boiling water takes it away from the bristles.
Kellene · June 4, 2009 at 3:02 am
Good question. I just put it in a small pan of water and let it boil a bit. It melts away and the boiling water takes it away from the bristles.
Kelly Bastow · June 5, 2009 at 5:39 pm
Hi Karen!
I too am wondering if when you store waxed cheese over a period of time if it gets stronger in taste.
If so, what is your suggestion as to the kind of cheese to wax that is mild so as to ward off having it get strong when being stored?
Kelly Bastow · June 5, 2009 at 5:39 pm
Hi Karen!
I too am wondering if when you store waxed cheese over a period of time if it gets stronger in taste.
If so, what is your suggestion as to the kind of cheese to wax that is mild so as to ward off having it get strong when being stored?
Kellene · June 5, 2009 at 5:47 pm
The cheese wax itself has no taste. But yes, the cheese will “sharpen” with age. That’s how you have “mild, sharp and extra sharp” kinds of cheddar cheese. It’s all about the time they were allowed to age. The kind of wax you use will not affect whether or not your cheese ages. It’s a fact of being. Cheese will age. But I’ve never had cheese age to the point that I didnt’ like it. In fact, I find that I simply need less of the sharper cheese to give the dish the taste I was looking for. This is especially true with the cheddar and Swiss varieties.
TNDadx4 · June 10, 2009 at 5:26 pm
This is a great article! Thank you so much!
I have several questions…
1. Is there any special prep needed when buying cheese that has already been refrigerated?
2. Can refrigerated, but waxed cheese be left out?
3. You mentioned cheese life at cool temperatures. How does it’s shelf life compare at warmer temps?
4. How can I tell if the cheese is bad when we unwrap it?
I’m sorry for all of the questions, but we are really new at this.
Thanks again!
Kellene · June 10, 2009 at 6:05 pm
Don’t worry about the questions. Most folks ARE new to waxing their own cheese.
Before I wax the cheese, I like it to sit at room temperate for just a bit in order to ensure that it doesn’t get condensation from being too cold and then applying the cheese wax. If your cheese is completely sealed in wax, then yes, it sure can be left out. Mine is in my basement. At warmer temperatures (say consistently above 77 degrees) the shelf-life of the cheese will be compromised. Many Europeans used to keep their waxed cheese underground in a cellar to ensure the right environment. When you unwrap the cheese the only indicator of whether it’s bad or not will be mold or it has completely dried out. I prefer the mold. The reason being is that when it comes to cheese, you can actually cut off the mold and still salvage the remainder. Bottom line, just dont’ skimp on the cheese wax and make sure you get it completely sealed with it.
sally mcbride · June 19, 2009 at 11:41 pm
Hi
thanks for this site! I heard about waxing cheese, but I did not know about cheese wax. I used paraffin wax. I put about 15 coats of the wax. I just noticed there is a yellow liquid coming out of a couple of the blocks and some yellow liquid in one of the blocks. Should I reseal the two that are leaking? Should I open the one with the yellow liquid?
The others seem fine should I just put them downstairs and keep them in my storage?
Thanks,
Sally
Kellene · June 20, 2009 at 2:59 am
I dont’ recommend using paraffin wax, as you may already know now. If it’s leaking, I would open it up and use it up, not try to seal it again. Usually when this happens it’s because the cheese was too cold when you waxed it, causing it to expand when you put the hot wax on it, then shrink when it cooled down. This causes a gap. The liquid you’re talking about is probably just moisture. But I wouldn’t take any chances. If the others are fine, I’d put them in cool, dry storage.
Lillian · June 26, 2009 at 2:52 pm
I was told that if cheese has mold that you should not use it as the bacteria or whatever caused the mold is throughout the cheese, even if you do not see it. Has new information been found or was I told wrong by the science teacher?
Lillian · June 26, 2009 at 2:52 pm
I was told that if cheese has mold that you should not use it as the bacteria or whatever caused the mold is throughout the cheese, even if you do not see it. Has new information been found or was I told wrong by the science teacher?
Kellene · June 26, 2009 at 3:26 pm
Because cheese is so dense, mold penetrates from the outside to manifest itself. Whereas with bread, it penetrates all the way through and then manifests itself on the outside. So yes, you can cut off the molded area of cheese and then still consume what’s remaining that has not developed mold.
Kim · July 10, 2009 at 1:31 am
Cheese will definitely save my family!!!
However, I have to get this waxing thing right.
A friend and I waxed some cheese about 2 months ago. We used cheese wax from a reputable company. We waxed mild cheddar that was bought vacuum sealed like at the grocers and SAMS. We waxed a 16oz block and four 1.25lb blocks that were bought as one 5lb sealed block.
When I cut the 5lb block I was not wearing gloves. So it is possible that I could have gotten hand oils on the cheese. We wore gloves when we waxed and the cheese was at room temp.
We waxed all but one by brushing 3 layers on and made sure they were completely covered. The one I “dipped” got way slick and fell into the pot. I let it cool and it looked fine. All of the blocks were stored on a shelf at room temp.
We have since experienced 2 problems with our waxed cheese.
First, it leaks an oily substance, but only from one block. It is yucky!! Thought this might be the one I dropped in the wax.
Or, could it be the buttermilk separating from being stored too warm?
Second, the other blocks have cracked at the corners. They look as though the cheese shrank and then the wax cracked.
Thanks,
Kim
Kellene · July 10, 2009 at 5:07 am
Every so often I get this very same question with the exact same scenario–even on my voicemail. Since I’m not there, I can’t tell you exactly what went wrong, but I can tell you what is USUALLY the case. 1- I put 4 to 5 coats on my cheese. Again, let it cool completely in between coats so that you don’t have the shrinking and then expanding. 2- You’re smart to wax it only at room temperature. 3- I store mine hanging in cheese cloth so that the air circulates nicely. I hope that ONE of these suggestions helps you.
jannzter · April 5, 2012 at 8:42 pm
Very helpful. Yesterday I had a couple of problems and now I think I’ve figured out what went wrong.
1. cheese was straight from the fridge so (too cold)
2. wax had heated to over 220 degrees so (too hot)
combination caused the wax to separate from the cheese.
I took all the wax off and started over. blotting the cheese with paper towels, adjusting the temp on the wax. Results; Success
Emelie · July 17, 2009 at 7:16 am
Thank you for this info! I have been interested in doing this for some time. I’m not necessarily too worried about waxing it and then sitting it on the shelf for 25 years, I intend to use it much more frequently thatn that to make sure it stays good and I am not wasting my ca$h. I contacted a reputable cheese making website and asked questions about where to store my cheese living in las vegas where its pretty hot most of the year. He said he was hearing more and more questions like mine from out west: utah, arizona, nevada. I don’t think that’s a surprise 😉 What are your thoughts on where to store my cheese? He also said that I shouldn’t be buying store bought cheese to wax because it hasn’t matured yet. I’m doing a homemaking meeting on this and want to make sure I have the best info.
Kellene · July 17, 2009 at 4:51 pm
First of all, you do know that I’ll be doing a class in Vegas next week, right? Check our “schedule” on the first page you see here.
Secondly, I would store the cheese under beds in your scenario since you likely do not have a basement. Store them on top of a cardboard layer first–not plastic or foil. This is fine for the heat. When it’s cold down there though and you’ve got the heat on, store them in a less confined place where they would be less suseptible to the heat vent. I’m a big proponent of hanging it from the ceiling of a room, but that’s not always practical in the NV and AZ homes. Fortunately many homes in Utah have basements, us included. So we store ours that way. If your cheese is too soft, it will not store properly. My favorite place to buy cheese is from the dairy farms that sell it and focus on quality cheese specifically. Matured, hard cheese is ideal to wax.
Bonnie · July 18, 2009 at 9:54 pm
While the tillamook cheese in the 1lb size was on sale for $1.19 I bought 30 lbs I would like to wax. Few questions after reading this blog.
Can I do that type of chees
Where on the web do you get the wax
If I come to your house will you help me.
Bonnie · July 18, 2009 at 9:54 pm
While the tillamook cheese in the 1lb size was on sale for $1.19 I bought 30 lbs I would like to wax. Few questions after reading this blog.
Can I do that type of chees
Where on the web do you get the wax
If I come to your house will you help me.
Bonnie · July 18, 2009 at 10:53 pm
While the tillamook cheese was on sale I bought 30 lbs. Now I need to find the wax. I looked locally. (Salt Lake) and can not find it. So a couple of questions.
Where is the best place on line to buy the wax?
Will this cheese work for waxing
If I come to your house will you help me? (kidding)
Kellene · July 20, 2009 at 9:43 pm
Bonnie, YOu can go here to buy your wax. I prefer the red wax. http://www.cheesemaking.com/store/p/63-Red-Wax-1-pound.html
Yes, your cheese will work for waxing, however it’s a softer cheese, so I would use the additional papers that the cheesemaking site recommends along with your wax. Hmmm…coming to my home. That will be quite the trick with all of the classes I have planned. But perhaps I should try to schedule a class just on cheesewaxing. I’ll keep you posted.
Jackie · July 21, 2009 at 12:41 am
Where do you buy your cheese wax and brush and how many pounds of cheese will 1 pound of wax do?
Thanks
Jackie
Jackie · July 21, 2009 at 12:41 am
Where do you buy your cheese wax and brush and how many pounds of cheese will 1 pound of wax do?
Thanks
Jackie
Kellene · July 21, 2009 at 2:37 pm
Jackie,
See the comment just above for a place to buy your cheese was and the boars head brush. How your cheese is shaped and how small it is will determine how much you can wax. I would say a pound of cheese wax will do about 12-20 pounds of cheese if you brush it on. If you plan on dipping it, then you’ll need about 5 pounds of wax for the same amount.
howlingduckranch · July 27, 2009 at 3:45 am
Interesting post. I’ve been teaching myself to make cheese this past year or so but I’ve been to scared to use the wax after reading that it is incredibly flammable. You make it look and sound ‘do-able’.
Incidentally, do you have a ‘recent posts’ section? I don’t see it.
cheers,
HDR
Kellene · July 27, 2009 at 2:26 pm
Many readers and those attending my classes have had great success with the cheese waxing. I LOVE it!
You can see the “recent posts” simply by scrolling down the landing page of prepreparednesspro.wordpress
Kellene · July 27, 2009 at 2:26 pm
Many readers and those attending my classes have had great success with the cheese waxing. I LOVE it!
You can see the “recent posts” simply by scrolling down the landing page of prepreparednesspro.wordpress
Karen · July 30, 2009 at 5:37 pm
Okay I need some help!! I have been waxing my cheese and loving it. I have cheddar, parmesan, monterey jack, cheddar jack and mozzarella.
I have had great success with all but the mozzarella. It is consistently going bad. I had read that mozzarella was great to wax because it aged so slowly. My mozzarella is bloating the wax covering and when I cut into it is is very obviously fermented.
All of my cheese is kept in the same room on the same shelf at between 60 and 65 degrees.
Any thoughts? Is mozzarella to soft to wax?
Kellene · July 30, 2009 at 6:10 pm
Not all mozzarella is created equally. I too love my mozzarella, however, I choose to use the harder mozzarella. One trick you may want to use though is to pat your cheese with a paper towel to blot all of the moisture prior to waxing/dipping it. You’ll find more success this way, I’m certain.
Karen · July 30, 2009 at 7:06 pm
Thank you for the reply. I do blot all of my cheese with paper towels before dipping; I find that to be a good practice regadless of the variety.
I will purchase harder blocks of mozarella and give that a try.
thanks.
Karen · July 30, 2009 at 7:06 pm
Thank you for the reply. I do blot all of my cheese with paper towels before dipping; I find that to be a good practice regadless of the variety.
I will purchase harder blocks of mozarella and give that a try.
thanks.
BONNIE · July 31, 2009 at 6:41 pm
please do. West Jordan will do nicely
BONNIE · July 31, 2009 at 6:41 pm
please do. West Jordan will do nicely
Becka · August 2, 2009 at 1:57 pm
I have a question regarding the cheese wax. No where can I find whether you can use bee’s wax. Can you? We have a close friend who raises honey and we get a lot of honey and wax from them. I have bought and used the commercial cheese wax, I was just wondering about the bee’s wax. A long-term ready supply.
Thanks!
Kellene · August 2, 2009 at 5:33 pm
Becka, Sorry. I have no idea about honey wax. However, given that honey is the only food that never spoils, I’d actually be a bit attracted to the idea since my thought would be that the wax would be great as well. But alas, I haven’t researched or used that method.
Becka · August 3, 2009 at 1:52 pm
I found an answer regarding the use of bee’s wax from Steve at http://www.thecheesemaker.com
“Yes, bees wax is natural but you should heat the wax to 160f so it is pasteurized.”
We are going to try with our next batch of cheddar.
Didn’t know if anyone else would be interested in this.
Kate@LivingTheFrugalLife · August 20, 2009 at 5:06 pm
This sounds like a great storage technique, and one I’ve heard little about. I have to admit though that I’m a little nervous about it. Handling a room temperature ingredient and then putting it into airtight storage for a year or more just sounds like a recipe for spoilage to me. What am I missing? How could the random critters on our hands and in the air *not* have a grand old time on that hunk of protein, fat, and carbs once we let it hang out indefinitely at room temperature. I guess I could see dipping a block of cheese in really hot wax as something that would take care of any bacterial contaminants. Brushing wax on sounds more risky.
I’m generally not alarmist about food safety, but I sure would hate to spend the money to put up such an expensive item and then find it spoiled later on.
Kellene · August 20, 2009 at 5:21 pm
Kate, check out our other aritcle that was posted yesterday “Settling the Cheese Wax Controversy” I believe you’ll have your questions answered there.
Kellene · August 20, 2009 at 5:21 pm
Kate, check out our other aritcle that was posted yesterday “Settling the Cheese Wax Controversy” I believe you’ll have your questions answered there.
Kellene · August 20, 2009 at 5:25 pm
Bees wax is my second choice if cheese wax is not available. However, be sure you have the right temperature. you need 180 degrees F, not 160 degrees F, in order for pasteurization to take place. In that case, since your wax will cool a bit when it comes in contact with the cheese, you need to heat your wax to 200 degrees F. in order to be safe.
John · October 19, 2009 at 12:21 pm
I want to wax 2lb pieces of deli type provolone cheese and age for 2-3 years. Will it get sharp like good aged provolone?
Thanks for all the great information!
John · October 19, 2009 at 12:21 pm
I want to wax 2lb pieces of deli type provolone cheese and age for 2-3 years. Will it get sharp like good aged provolone?
Thanks for all the great information!
Kellene · October 19, 2009 at 3:30 pm
Yes, indeed it will get sharp. However, provolone is a softer cheese. Until you’ve aged it well so that it hardens a bit, I wouldn’t recommend you storing it outside of refrigeration initially.
Kellene · October 19, 2009 at 3:30 pm
Yes, indeed it will get sharp. However, provolone is a softer cheese. Until you’ve aged it well so that it hardens a bit, I wouldn’t recommend you storing it outside of refrigeration initially.
Joe · October 19, 2009 at 3:45 pm
This post just made my day! Thanks.
Joe · October 19, 2009 at 3:45 pm
This post just made my day! Thanks.
Carol · October 20, 2009 at 3:33 pm
Hi, what a great idea! Thanks so much for this. I’m going to try it. How do you keep the cheese from rodents and such if you don’t put it in containers? Carol
Carol · October 20, 2009 at 3:33 pm
Hi, what a great idea! Thanks so much for this. I’m going to try it. How do you keep the cheese from rodents and such if you don’t put it in containers? Carol
LuAnn Gardner · November 6, 2009 at 11:10 pm
Is there a way to can sour cream? I know you can buy it canned, but can you can it at home? If not how do you make sour cream out of powdered milk? Thanks so much. I love your blog and all your information is so helpful.
LuAnn Gardner · November 6, 2009 at 11:10 pm
Is there a way to can sour cream? I know you can buy it canned, but can you can it at home? If not how do you make sour cream out of powdered milk? Thanks so much. I love your blog and all your information is so helpful.
Denise · June 18, 2011 at 5:57 pm
Now I am very hungry. Yet another item I cannot wait to try. My husband lives and surely will die by the cheese… I am handing off the enchilada recipe to him, we’ll likely have this tonight for dinner…Thank you!
Denise · June 18, 2011 at 5:57 pm
Now I am very hungry. Yet another item I cannot wait to try. My husband lives and surely will die by the cheese… I am handing off the enchilada recipe to him, we’ll likely have this tonight for dinner…Thank you!
Anne · January 20, 2012 at 6:15 pm
Can “store bought” waxed cheese such as Babybel or others from a deli be stored at room temp? Assuming, of course, completely sealed.
Kellene Bishop · January 20, 2012 at 10:00 pm
Nope, that wax is just for marketing purposes and in no way indicates that it is sufficiently hard cheese to leave at cool room temperatures.
NatalieAnnDeGraw · February 19, 2012 at 7:14 am
i am definitely going to try this i am so excited as i get coupons to buy cheese or its cheaper to buy in bulk but my family does not eat cheese enough to eat it all and half the block usually end up going bad. If you live in apt do you think it would be ok to stack them in a box and store them in a closet or under a bed?
Preparedness Pro - Kellene Bishop · February 19, 2012 at 8:56 am
@NatalieAnnDeGraw When I lived in my 800 sf apt. I stored a LOT of food items under the bed and in closets b/c it was cooler there (You can fit an entire years supply of essentials under a twin size bed). But ultimately, it’s going to depend on the temp. that you keep your apt.; check to make sure those areas are cool enough, and remember, cheese needs to breathe.
NatalieAnnDeGraw · February 19, 2012 at 7:31 pm
So i know that you said you designate a pan for melting the cheesewax in but what do you do with it after your done dipping the cheese you have. Do you just leave the excess cheesewax in that pan for the next time or do you spoon it out into another container? Just curious. Also I saw on your doomsday prepper’s episode that you use solar power to cook things. Do you have a section on your website about that? I have to admit once i saw you on the show it was enough to make me want to move next to you and learn all your secrets as everything you did on the show are things i want to learn how to do. I am not a scary stalker it was just amazing all the things you know how to do that i would love to learn.
Preparedness Pro - Kellene Bishop · February 19, 2012 at 11:23 pm
@NatalieAnnDeGraw Yes, use the search bar on the site. It’s your friend. 🙂
mostafa · February 29, 2012 at 3:37 pm
a Cheese Toastie or jlfafe. Mum used to make them with tinned salmon instead of cheese, it just wasn’t the same :(Love the picture 🙂
mostafa · February 29, 2012 at 3:37 pm
a Cheese Toastie or jlfafe. Mum used to make them with tinned salmon instead of cheese, it just wasn’t the same :(Love the picture 🙂
Amara Russell · April 14, 2012 at 7:09 am
Thanks for great instructions…very helpful.
Re: using Bees wax…I suggest making sure your beekeeper doesn’t use *any* petrochemicals of any kind in the hives from which the wax comes. Yes, bees wax is natural, but any additives to kill mites, moths, fungus, etc. are definitely *not* natural – or non toxic – substances…residues will be in the wax as the bees wax absorbs contaminants within the hive to it’s capacity, the excess is detectible in honey when it’s analyzed in a lab. “Cosmetic Grade” bees wax is *loaded* with contaminants…a treatment-free apiary is worth supporting when you find one.
Jaimee · April 19, 2012 at 8:11 am
I just want to clarify that I can wax the cheese I buy out of the supermarket right? Also, after I wax it can I store it in my refridgerator or not and if I do experience a power outage and had to remove the cheese from the refridgerator would that effect the cheese? I’m new to prepping and trying to learn as much as possible. Thank you for investing your time to help others like myself be prepared.
Kellene Bishop · April 19, 2012 at 3:34 pm
You’ll want to be sure to read all of the details on cheesewaxing, because I can’t really say “yes” to your questions as they are posed. There’s more to it than that. If you don’t find the additional articles on here, you can just go to the “Prep Pro Classes” tab and get the “For The Love of Cheese” that includes a resource guide and DVD instruction. Good luck!!
Laurie · July 24, 2012 at 2:00 am
Can a Crockpot/slow cooker be used instead of a double boiler or “dedicated” cheese wax pot? I figure the slow cooker would heat evenly and gently, and the ceramic would clean better than a metal pot.
So… if you’re still responding to queries on this topic two years later, thanks for the help! LOL
P.S. I still can’t wait to preserve my eggs with mineral oil. That project is coming up the next time they’re on sale!
Kellene Bishop · July 24, 2012 at 4:37 am
Yes you can but know that you will totally ruin the crockpot. You won’t ever get the wax cleaned out of it. 🙂 That’s why I use the rectangular pans (like you see in the buffets in the restaurants) I bought a shorter one that fits into a deeper one and they are indeed my dedicated cheesewaxing pans. I store the melted cheesewax in them with foil tightly wrapped around them.
Caitlin · February 18, 2014 at 8:42 pm
I have been holding on to
I have been holding on to this info for a little while now and just purchased my wax to get going. I’m especially excited to buy blocks and cut them into portions for BOB meals and not worry about them expiring! I currently have velveta in my BOB because it’s shelf stable, but, as a fellow cheese lover I know you’ll agree, it just isn’t cheese. Though it does make a good queso dip.
Preparedness Pro · February 19, 2014 at 3:00 am
Remember, they need to be
Remember, they need to be stored with air circulation, not in a baggie or a backpack until you’re ready to use them.
Caitlin · February 19, 2014 at 2:33 pm
Yup! I’ve been thinking how
Yup! I’ve been thinking how best to do this and I think I will get some mesh bags to store the cheese in and clip these to the outside of the BOBs. Thanks for making sure though!
Heidi Davis · February 24, 2014 at 12:30 am
How do your cheeses taste
How do your cheeses taste after they have been stored since 2009? An update on taste/texture/storing conditions would be very informative. Thank you for all you do on this site to help us all learn a little more everyday.
Preparedness Pro · February 24, 2014 at 9:08 pm
Just sharper… I find that
Just sharper… I find that the flavors are so much more pronounced and since they are sharper, I get to use less for the tastes! *grin*
Nelda · April 22, 2014 at 10:38 pm
I waxed a bunch of cheese in
I waxed a bunch of cheese in small blocks, put them in basement, and a few months later saw puddle of water on floor…they were handing in netting…they had leaked lots of water in the wax and then started dripping through. 4 coats, red wax…should I have dried cheese 1st??
Preparedness Pro · April 23, 2014 at 8:17 am
Yup!
Yup!
Randy · April 28, 2014 at 11:24 pm
My wife and I saw this on a
My wife and I saw this on a Prepper show and did wax a few different types of store bought blocks of Mild Cheddar, Pepper Jack and Mozzarella… waxed in late ’11.. the Mozz didn’t hold up over time and did bloat like another post mentioned.. My wife doesn’t like the “Bite” she gets from the aged cheeses? Do they need a little fresh air after opening them up to kinda take the sharpness out?? Rinse them and dry? They seem fine but scare her! LOL.. I did also try a sliver of the bloated Mozz… it tasted a little like Parmesan to me… was it bad with that water in it? Thanks for your time!! I LOVE TO WAX CHEESES!!
Preparedness Pro · April 28, 2014 at 11:32 pm
Unfortunately, you waxed
Unfortunately, you waxed cheeses that would not have qualified for waxing. The key is DRY/HARD cheeses. Mozzarella would never qualify. When I purchase store-bought cheeses, I always let them “weep” on the counter for several days, blotting them with vinegar as they dry out. (The manufacturers nowadays pump their cheeses and meats up full of water in order to eek out a little bit more money.) Then, and only then can you wax them. But if your wife doesn’t like sharp tasting cheese, then this is definitely not the answer for you. The longer a cheese sits, the more sharp it will become.
abby · June 15, 2014 at 11:20 pm
I have an old video over the
I have an old video over the door shelving rack, wouldn’t this be good to put the cheese on to get air circulation?
Preparedness Pro · June 18, 2014 at 7:43 am
Yes, it would. Be sure that
Yes, it would. Be sure that you have a cloth lining it or the floor as you will get weeping initially when you store them in the event that you didn’t get all of the liquid out in the first place.
Angela · July 26, 2014 at 6:34 pm
On figuring out where to
On figuring out where to store the cheese, I know it should be dark and cool, the basement is too damp, but what about like a cabinet with absorbers in it?
Preparedness Pro · July 27, 2014 at 10:55 pm
You’ll want some air movement
You’ll want some air movement, ideally. There really wasn’t any such thing as a “cheese cupboard” for a reason. 😉
Joan McLain · February 27, 2015 at 5:26 am
where can I buy the cheese
where can I buy the cheese was ?
Preparedness Pro · February 27, 2015 at 5:42 am
https://www.amazon.com/Cheese
https://www.amazon.com/Cheese-Wax-1-lb-Red/dp/B0064OLVFY/ref=as_sl_pc_ss_til?tag=prepapro-20&linkCode=w01&linkId=UXNVQS4AXMM6OSRG&creativeASIN=B0064OLVFY
Here’s a link for ya. 😉
Inquisitor · March 23, 2015 at 5:28 pm
Thank you for a great article
Thank you for a great article. It was exactly what I wanted hear for taking some cheese (truly ambrosia) into the mountains on a long duration backpacking trip.
I’m sure cheese wheels in nice cheese shops (that are already out on the counter) are good to go. But I noticed on the “Mini Babybel” FAQ that they only say it’s good for one day outside of the refrigerator. I’m not saying I’m normally a fan… it just they were the perfect package size for one serving. I’m guessing it might just be corporate liability paranoia; but… it got me thinking on two options.
(1) Are other cheeses with wax coatings found in main-stream grocery stores (in the refrigeration section) usable without refrigeration?
(2) If I coat the Mini Babybel using the techniques you describe, will they then be able to be kept out of the refrigerator?
Preparedness Pro · March 23, 2015 at 5:58 pm
Mini Babybel cheese is NOT
Mini Babybel cheese is NOT waxed for preservation purposes. Only for marketing purposes. The same holds true for anything else you’ll find in the grocery stores. That will be the case anywhere in the U.S. as the USDA does not condone waxing and storing cheese.
Gwen · March 25, 2015 at 2:57 am
I live in the south outside
I live in the south outside of Dallas. I have a dozen cheese blocks I am going to wax. I have the wax, brush, and dedicated double boiler. I am going to store in a “cool” dark room but it may get up to 80 degrees in there for a couple of months during the dog days of summer. Will that ruin my cheese or significantly shorten the shelf life? Thanks, love your blog.
Preparedness Pro · March 25, 2015 at 3:29 pm
It could ruin your cheese all
It could ruin your cheese all together actually in a matter of days at that temperature. At the very least, you’ll get weeping of the oils in the cheese at that temperature. Sorry, but you simply can’t store things successfully above 72 degrees–ESPECIALLY cheese.
Staci · July 11, 2015 at 3:05 pm
I love this idea however
I love this idea however there are several months of the year that my house gets quite a bit over 72 degrees, no basement. Can we wax the cheese and in the hotter months store in the fridge then hang it to store the other months? Would it be safe to move back and forth in that manner? Thanks for the info
Preparedness Pro · July 14, 2015 at 4:19 am
You COULD move it back and
You COULD move it back and forth, but you’ll get more sweating under the wax with that much of a temperature variance and that will cause separation. Bottom line is this, I INVEST in not just acquiring my preparedness supplies, but in protecting them as well.
Jen · August 27, 2015 at 5:11 pm
Can you make cream cheese out
Can you make cream cheese out of powdered milk? I’m totally new as well, and I think that would make prepping that much better!
Preparedness Pro · August 27, 2015 at 10:33 pm
Yep.
Yep.
Jen · August 27, 2015 at 5:11 pm
Can you make cream cheese out
Can you make cream cheese out of powdered milk? I’m totally new as well, and I think that would make prepping that much better!
Preparedness Pro · August 27, 2015 at 10:33 pm
Yep.
Yep.
Ginger · October 17, 2015 at 5:08 pm
Like some who have submitted
Like some who have submitted questions, I live in the South. We have high humidity, hot temps, no basements and bugs on a tropical scale. All of these factors make food storage challenging. I’ve heard that dipping the cheese in (or spraying on) vinegar will keep it from molding. Have you heard of this? If so, what do you think about doing this prior to dipping in wax?
Preparedness Pro · October 20, 2015 at 1:11 pm
Each of my cheese blocks gets
Each of my cheese blocks gets treated with vinegar prior to dipping in the wax because I want it to lose some of its moisture before waxing and to leave it on the counter for that to happen requires that I keep dabbing vinegar on it. Vinegar is another way to ensure less of the bad bacteria coming into play when waxing your cheese.
I live in a very humid area now too. But shelf-stable foods can still be successfully stored with a few modifications.
MPJ · July 28, 2017 at 6:39 pm
I am so pleased to be able to
I am so pleased to be able to wax cheese for the long term!! I have waxed @ 20 bars of store-bought cheese (Cheddar) and more than half of it ends up leaking a liquid and bloating after 1-3 weeks and i flip it and i am still not sure what to do. Any help would be appreciated! Thanks
Preparedness Pro · July 28, 2017 at 6:56 pm
So you’re either not letting
So you’re either not letting the cheese dry out enough before you wax, or you’re trying to wax cheese with too high a moisture content (which I guess is technically the same thing). Take the wax off, rinse thoroughly, cut off any mold, and let it dry while dabbing with vinegar during that process of drying.
Comments are closed.