Water Pasteurization Indicator
The WAPI Wonder: Your Tiny Water Savior for Camping and Crises
Alright, my self-sufficient superstars, gather ’round. We’re talking about the WAPI today. No, it’s not a new dance move or a high tech gadget. WAPI stands for Water Pasteurization Indicator, and it’s a tiny, mighty tool that tells you when your water is safe to drink without waiting for it to boil like a watched pot that never does.
What’s the Big Deal About a WAPI?
Now, why should you care about a WAPI? Imagine you’re out camping, or heaven forbid, in the middle of a crisis with your regular water supply out of commission. You need to know your water is safe without burning through all your fuel. That’s where our little friend, the WAPI, steps in. It’s a simple, reliable way to make sure your water is safe to drink by pasteurizing it at a temperature lower than boiling. Think of it as your water’s personal health inspector, but without the clipboard and stern looks.
How Does This Little WAPI Gizmo Work?
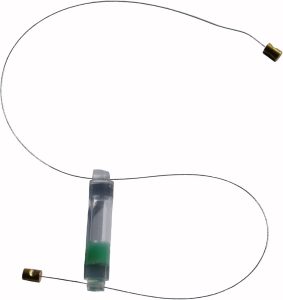
A WAPI is a clear plastic tube with some special wax inside that melts at 149°F (65°C). Here’s the science part: Water is pasteurized and safe to drink at this temperature, killing off those nasty germs that make you sick, without needing to reach the full-on rolling boil at 212°F (100°C). That means you save time, fuel, and frustration.
Using a WAPI is as easy as:
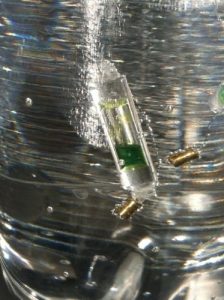
WAPI in water
- Fill it Up: Fill your container with water. (I use a Mason jar)
- Submerge the WAPI: Place the WAPI in the water with the wax at the top.
- Heat the Water: Heat your water until the wax melts and drops to the bottom of the tube. (I just set mine out in the sun or in the solar oven)
- Cool it Down: Once you see that the was has melted, your water is pasteurized! Let it cool down and drink up.
When I first started preparedness you could get these guys for $1.50. But now they are around $20 each! So I think it’s important to know how to make one yourself. Here’s how.
Make Your Own WAPI at Home: The DIY Route
Here’s what you’ll need:
- Clear, heat-resistant plastic tubing (about 2 inches long) (a clear straw will work in a pinch) You need to be able to see through it because you’ll need to see when the wax has melted.
- Non-toxic wax that melts at 149°F (65°C) (I suggest bees wax)
- Fishing line or thin wire
- Small weights (fishing sinkers work well)
- I also suggest using a eye dropper with a hole big enough to use with the wax.
Steps:
- Prep the Tube: Cut your plastic tubing to about 2 inches long. Prick a small hole at both ends of the tube.
- Seal it: Seal one end of the tube.
- Add the Wax: Melt your wax and pour a small amount into the tubing—with the eye dropper. You’ll be putting this wax in the “top” of the tubing. Make sure you’re using enough wax that you can see. You may want to dye the wax an easily viewed color such as red or blue or green. You’ll be dropping the wax at the opposite end of the tube where you made the hole. Let it solidify at the end of the tube.
- Seal It: Make sure both ends of the tube are sealed properly to prevent water from getting in. You can use a curling iron or a regular iron for this. If using either of those, I’d recommend using parchment paper between your heat source and the tubing, so you don’t get melted plastic on your heat source.
- Pinhole: Create a pinhole through each end of the tubing through the sealed portion.
- Thread It: Thread the fishing line or wire through the holes you made through tube. Attach small weights at the bottom end of the line on both ends to keep it submerged. The fishing line can be between 4 and 6 inches.
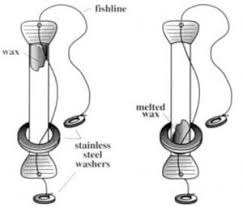
DIY WAPI instructions
Using Your Homemade WAPI
To use your DIY WAPI, follow the same steps as the store-bought version. Place it in your water, heat until the wax melts, and once it drops, you’re good to go!
WAPI in Action: Why You Should Love It
The beauty of a WAPI is in its simplicity and effectiveness. It’s lightweight, portable, and doesn’t need any batteries or fancy tech. Whether you’re backpacking through the wilderness, traveling to places with questionable water quality, or just want a reliable way to ensure your emergency water supply is safe, a WAPI is your best friend.
The best part is, if the sun is out, you can let the sun heat it up for you in the solar oven and save on your fuel. I like to have several jars going at the same time in the solar oven so that I have good clean water to use while I’m camping.
So, next time you’re packing for an adventure or prepping for the unknown, don’t forget your WAPI. It’s a small tool with a big impact on your health and safety.
Happy water pasteurizing, folks! Stay safe, stay hydrated, and keep prepping!