Which is better? Microgreens or sprouts?
Move over, regular greens! There’s a new superhero in town, and it’s wearing a tiny cape. Enter microgreens: the pint-sized powerhouses that are taking the culinary and preparedness worlds by storm. These adorable little plants are like the overachieving younger siblings of full-grown vegetables, packing a nutritional punch that would make Popeye’s spinach blush. In fact, these mini marvels can contain up to 40 times more nutrients than their mature counterparts. It’s like they’re saying, “Size doesn’t matter, but nutrient density does!”
Let’s talk prep, shall we? In a world where doomsday preppers are stocking up on enough canned beans to survive the apocalypse (and possibly cause one with all that gas), microgreens offer a fresher, more civilized alternative. Growing these miniature marvels indoors is easier than teaching a sloth to do yoga. You don’t need a green thumb; heck, you barely need opposable thumbs. All you need is a shallow tray with drainage holes, about 1-2 inches of potting mix, some seeds, and a bit of water. Sprinkle your chosen seeds (popular options include broccoli, radish, sunflower, and pea shoots) evenly over the soil, cover them up with a clear cover to create a greenhouse effect, and wait for the magic to happen. In about a week to ten days, you’ll have a crop of microgreens ready to harvest. It’s like having a salad bar that replenishes itself – minus the sneeze guard and questionable ranch dressing.
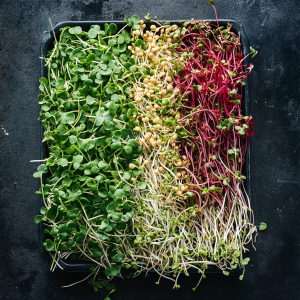
Now, let’s get to the good stuff – nutrients. Microgreens are like those overachieving kids in school who always scored 110% on tests. Red cabbage microgreens, for instance, have 6 times more vitamin C and a whopping 147 times more vitamin K than their fully-grown siblings. Daikon radish microgreens are showing off with 40 times more vitamin E than the full-grown vegetable. And cilantro microgreens? They’re packing 3 times more beta-carotene than mature cilantro. It’s a nutritional smackdown, and the tiny greens are winning by a landslide.
But wait, aren’t these just fancy sprouts? Hold your horses, sprout enthusiasts! While both are young and cute (as far as plants go), microgreens and sprouts are as different as a kitten and a tiger cub. Sprouts are basically seeds that have just woken up and decided to grow, while microgreens are the plant equivalent of toddlers – a bit more developed and ready to take on the world. Nutritionally, microgreens have the edge, boasting higher levels of vitamins and minerals. Plus, they’re less likely to harbor bacteria, making them the safer choice for those who like their greens without a side of food poisoning. Ok. Just a little melodrama there.
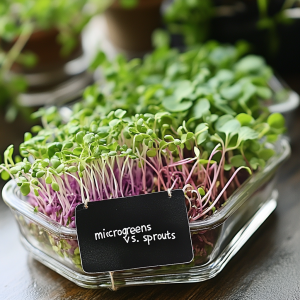
Microgreens vs. sprouts
So, how much of these nutritional wunderkinds should you be eating? While the USDA recommends 2.5 cups of vegetables per day for most adults, that’s based on boring old mature vegetables. For microgreens, aim for about 1-2 ounces (or 1-2 cups loosely packed) per day as a supplement to your regular veggie intake. Think of it as adding a turbo boost to your nutritional intake, not replacing the whole engine. You’re still going to want to eat your regular veggies, but adding that serving of microgreens can give you a significant nutritional edge without requiring you to munch on a mountain of greens.
Remember, variety is the spice of life (and nutrition). Different types of microgreens have different nutritional profiles, so mix it up! One day you might sprinkle some spicy radish microgreens on your salad, and the next day top your avocado toast with some sunflower microgreens. Your taste buds and your body will thank you for the diversity.
So, whether you’re preparing for the zombie apocalypse or just want to add some nutrient-dense pizzazz to your meals, microgreens have got you covered. They’re the superhero of the plant world – compact, versatile, and always ready to impress. Just remember, when the world ends, and you’re thriving on your windowsill-grown microgreens, don’t forget to share with your bean-eating neighbors. After all, in the post-apocalyptic world, he who controls the greens, controls the universe! And with microgreens, you’ll be controlling a universe of flavor and nutrition in every tiny leaf.
Now, let’s talk harvesting – the moment you’ve been waiting for since you sprinkled those seeds with all the care of a fairy godmother bestowing wishes. Microgreens are like the Goldilocks of the plant world – you want to harvest them when they’re just right. This magic moment usually occurs 7-14 days after planting, when the first true leaves appear above the cotyledons (those initial seed leaves that look like plant training wheels).
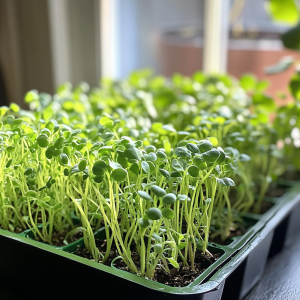
Growing Microgreens
To harvest, channel your inner Edward Scissorhands and snip the stems just above the soil line using clean, sharp scissors. It’s like giving your microgreens a stylish haircut – and you get to eat the trimmings! Don’t be shy; cut what you need for your culinary masterpiece and leave the rest to continue growing if you like.
But here’s the twist – microgreens are generally a one-and-done deal. Unlike that friend who overstays their welcome, microgreens don’t stick around for a second harvest. Once cut, they’ve given their all and won’t regrow. It’s their way of saying, “I came, I saw, I nourished.”
However, don’t let this send you into a spiral of despair! Remember how easy they are to grow? Simply plant a new batch every week or so, and you’ll have a continuous supply of these nutritional superstars. It’s like having a conveyor belt of health running on your windowsill.
This cycle of planting and harvesting means you’ll always have fresh microgreens at peak nutrition. Plus, it gives you the chance to experiment with different varieties. This week, arugula microgreens might spice up your life, while next week, sweet pea shoots could be stealing the show on your plate. It’s crop rotation for the impatient gardener – all the variety, none of the waiting!
So, grab those scissors and get harvesting. Your salads are about to get a gourmet upgrade, and your body will be doing a happy dance with all those nutrients. Just remember, in the world of microgreens, it’s not about the size of the plant in the fight, but the fight (and bite!) in the plant.
When it comes to microgreens, you’re essentially running a miniature intensive farming operation on your windowsill. Here’s the scoop on soil and microgreens:
While microgreens don’t stick around long enough to become drama queens and deplete your soil entirely, repeated plantings can indeed take a toll. These little overachievers are nutrient hogs, sucking up everything they can in their short lifespan. It’s like they’re cramming for a final exam, but instead of caffeine, they’re mainlining nitrogen and minerals. So be sure to water them with the Mittleider nutrients.
So, what’s a microgreen farmer to do? Well, you’ve got a few options, and they’re all easier than trying to reason with a stubborn toddler:
- Rotate your crop: Just like big-time farmers, you can switch up what you’re growing. Different microgreens have different nutrient needs, so this gives your soil a bit of a breather.
- Compost your spent crop: When you’re done harvesting, don’t toss those root mats and leftover soil. Compost them! It’s like recycling, but for plants. This compost can then be used to enrich your next batch of soil.
Remember, microgreens are the sprinters of the plant world – they’re not in it for the long haul. By giving your soil a little TLC between crops, you can keep your microgreen marathon going indefinitely. It’s all about finding that sweet spot between intensive production and soil health.

Microgreen salad
So don’t worry – with a bit of soil savvy, you can keep your microgreen factory running smoothly. Your soil won’t wear out; it’ll just need an occasional pit stop to refuel. Keep those greens coming, and your taste buds (and nutrition levels) will thank you!
Join us on Facebook at www.facebook.com/preparednesspro