Homemade Beeswax Wrap
In a world obsessed with disposable plastic, the humble beeswax wrap stands as both an ancient wisdom and modern solution for those serious about self-reliance. These flexible, reusable coverings aren’t just for the environmentally conscious—they’re practical tools in any prepper’s arsenal.
Unlike plastic wrap that creates dependency on supply chains and generates waste, beeswax wraps can be made at home from materials you can source locally or even produce yourself. They work by creating a breathable, slightly adhesive barrier that preserves food naturally while allowing necessary airflow that prevents condensation and premature spoiling.
Why Beeswax Wraps Matter for Preparedness
The science behind their effectiveness is straightforward: beeswax contains natural antibacterial properties, while the slight permeability allows ethylene gas (the ripening hormone in fruits and vegetables) to escape rather than accelerate decay. This breathability creates the perfect environment for cheese, bread, and produce—extending shelf life without electricity.
For emergency situations, these wraps serve multiple purposes beyond food storage. The waxed fabric becomes naturally water-resistant, making them useful for collecting morning dew, covering containers, or even as emergency bandage covers in a pinch. Their pliable nature means they conform to irregular containers—perfect for covering foraged foods when standard storage options aren’t available.
Materials You’ll Need
For a basic set of 3-4 wraps in various sizes:
- 100% cotton fabric (1/2 yard) – Tightly woven, thin to medium weight works best. Pre-washed quilting cotton, old bed sheets, or cotton shirts are perfect. Avoid synthetics as they won’t absorb the wax properly.
- Beeswax (4-5 oz) – Raw, unfiltered beeswax from local beekeepers is ideal. If sourcing locally isn’t possible, look for pellets or blocks of pure beeswax without additives.
- Pine rosin/resin (2 oz) – This natural tree resin adds the tacky quality that makes the wraps cling to containers. Find it at specialty craft stores or from suppliers that serve beekeepers.
- Jojoba oil (1 tablespoon) – This extends the life of your wraps by adding flexibility and preventing the wax from cracking. Unlike other oils, jojoba doesn’t go rancid quickly.
- Parchment paper – To protect your ironing surface and oven trays.
- Scissors and ruler – For cutting fabric to size.
- Paint brush (optional) – A natural bristle brush works best if using the brush method.
- Cheese grater (optional) – For grating block beeswax if not using pellets.
Tools for Different Methods
You have three main options for melting and applying the wax mixture. Choose based on what’s available:
Option 1: Oven Method (Most reliable and even application)
- Baking sheet
- Oven
- Tongs for handling hot fabric
Option 2: Iron Method (Good for small batches or touch-ups)
- Iron
- Additional parchment paper
- Ironing board or heat-resistant surface
Option 3: Double-Boiler Method (Most grid-down friendly)
- Double boiler setup (pot with water and heat-safe bowl)
- Heat source (stove, camp stove, or even a well-managed fire)
- Natural bristle brush
- Clothesline and clothespins for drying
Preparing Your Fabric
- Pre-wash your fabric without fabric softener to remove any manufacturing chemicals or sizing.
- Iron the fabric to remove wrinkles, which could create air pockets during the wax application.
- Cut your fabric into desired sizes:
- Small (8″x8″) – Good for covering small bowls, fruit halves, or wrapping snacks
- Medium (11″x11″) – Perfect for sandwich wraps or medium bowls
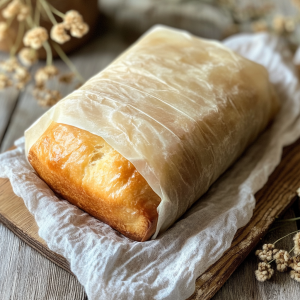
- Large (14″x14″) – Ideal for bread loaves, large bowls, or bundling herbs
- Extra Large (16″x20″) – Useful for covering casserole dishes or wrapping larger items
- Finish the edges (optional) – While not strictly necessary, you can prevent fraying by using pinking shears to cut the fabric or by sewing a simple hem.
The Basic Wax Mixture
The perfect ratio for durable, clingy wraps:
- 4 parts beeswax
- 1 part pine rosin
- 1/4 part jojoba oil
For a small batch (enough for 3-4 medium wraps):
- 4 oz beeswax (about 1/2 cup pellets or grated wax)
- 1 oz pine rosin (about 2 tablespoons)
- 1 tablespoon jojoba oil
Method 1: Oven Technique (Recommended for Beginners)
- Preheat your oven to 225°F (107°C) – low and slow is key to prevent scorching.
- Prepare your baking sheet by lining it with parchment paper.
- Lay your fabric flat on the parchment paper.
- Create your wax mixture:
- If using a block of beeswax, grate it first
- Mix the grated beeswax, pine rosin, and jojoba oil in a bowl
- Sprinkle the mixture evenly over the fabric (about 2 tablespoons for a medium-sized wrap)
- Place in the oven for 5-10 minutes, watching carefully until the mixture is fully melted and the fabric appears saturated. The fabric should look wet, but not pooling with excess wax.
- Check for even coverage – if you notice dry spots, use a paintbrush to spread the melted mixture while still hot.
- Remove from oven using tongs and hold up immediately (be careful, it’s hot!) to let excess wax drip off.
- Wave the fabric gently in the air for about 30 seconds until the wax begins to set but is still pliable.
- Hang to dry completely (about 5 minutes) on a clothesline or drying rack.
Method 2: Iron Technique (Good for Off-Grid Situations)
- Prepare your ironing surface by covering it with several layers of parchment paper.
- Melt your wax mixture separately in a double-boiler setup until fully combined.
- Place your fabric on the parchment paper.
- Brush the melted mixture onto the fabric, ensuring even coverage.
- Cover with another sheet of parchment paper.
- Iron on medium heat (no steam) until the wax is fully melted and distributed, moving the iron constantly to prevent scorching.
- Remove the top parchment carefully while the wax is still warm.
- Wave until cool enough to handle, then hang to fully set.
Method 3: Direct Application (Most Grid-Down Friendly)
- Set up a double boiler – even a pot with rocks in the bottom to elevate a metal bowl works in a pinch.
- Melt your ingredients together, stirring occasionally until fully combined (the pine rosin takes longest to melt).
- Dip your fabric quickly into the mixture, or brush the mixture onto the fabric if it’s too large to dip.
- Remove excess by gently pulling the fabric between two fingers or wooden utensils.
- Hang immediately to cool and set.
Troubleshooting Common Issues
- Too stiff? Your wraps should be pliable enough to fold without cracking. If they’re too stiff, reapply heat and add a tiny bit more jojoba oil.
- Not tacky enough? If your wraps don’t cling well, you likely need more pine rosin in your mixture. Reapply heat and sprinkle on additional powdered rosin.
- Excess wax pooling? If you notice thick spots, sandwich the wrap between parchment paper while still warm and iron on low heat to redistribute.
- Fabric showing through? If areas look unwaxed, apply more mixture to those spots using any of the methods.
Using Your Beeswax Wraps Effectively
- Activate the cling by warming the wrap between your hands for a few seconds before use. Your body heat softens the wax just enough to make it moldable.
- Wrap with purpose – create a seal by ensuring the wrap overlaps itself or forms a tight seal against container edges.
- Avoid heat sources – keep away from hot food, dishwashers, microwaves, or hot water which will melt the wax.
- Not for everything – avoid using with raw meat, fish, or long-term storage of very moist items which could lead to mold growth.
Maintaining Your Wraps
- Clean after each use with cool water and mild soap (castile soap works well). Gently wipe rather than scrub.
- Air dry completely before storing or reusing.
- Refresh when needed – after 6-12 months of regular use, your wraps may begin to lose their cling. Simply reapply heat and a small amount of new wax mixture to restore them.
- End-of-life options – When they’re truly beyond refreshing (usually after many years), cut them into strips for fire starters or compost them.
Beyond Food Storage: Emergency Applications
- Water collection – The water-resistant nature makes them useful for directing rainfall or morning dew into containers.
- Emergency bandage covers – In a pinch, the antibacterial properties of beeswax make these suitable temporary bandage covers (though not replacements for proper medical supplies).
- Makeshift containers – Form them into temporary bowls by molding when warm over an appropriately shaped object.
- Firestarters – At the end of their useful life, beeswax wraps make excellent firestarters for emergency situations.
The psychological component shouldn’t be overlooked—maintaining normal food preparation routines during grid-down situations provides comfort and stability. These colorful, practical tools help maintain that sense of normalcy while reducing dependency on disappearing resources.
Most importantly, mastering this skill now—before you need it—adds another layer of resilience to your preparedness strategy. While others scramble for solutions when plastic wrap becomes unavailable, you’ll already have a sustainable system in place that works without electricity, without waste, and without ongoing expense.