compost carefully in a society down scenario
In a world where the systems we rely on have broken down, proper compost waste management becomes more than just an environmental concern—it’s a matter of survival. Improper composting can lead to the spread of diseases, contamination of water sources, and even deaths within a 3-mile radius. This guide will help you and your community safely manage waste through composting.
The Basics of Survival Composting
- Location, Location, Location: Set up your compost pile at least 200 feet away from any water sources and living areas.
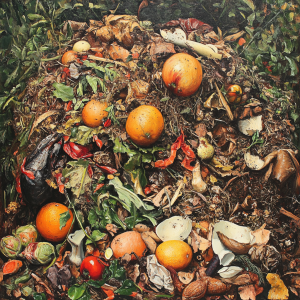
- The Right Mix: Aim for a balance of “green” (nitrogen-rich) and “brown” (carbon-rich) materials. Green materials include food scraps and fresh plant matter, while brown materials include dry leaves, straw, and small wood chips.
- Size Matters: Keep your pile at least 3 feet cubed to generate enough heat to kill pathogens.
- Turn Baby, Turn: Regular turning (every 1-2 weeks) ensures even decomposition and helps control odors.
- Temperature Control: The core of your pile should reach 131-170°F (55-77°C) to kill harmful pathogens. Use a compost thermometer if possible.
Moisture Management in Detail
Proper moisture is crucial for effective composting. The ideal compost pile should feel like a wrung-out sponge – moist, but not soggy.
How to Check Moisture Levels of Compost:
- Squeeze Test: Take a handful of compost material and squeeze it.
- If water drips out, it’s too wet.
- If it holds its shape and feels damp, it’s just right.
- If it falls apart and feels dry, it needs water.
When It’s Too Wet:
If your compost is too wet, you might notice a slimy texture, foul odors, or even see standing water. Here’s how to fix it:
- Turn the pile: This helps aerate the compost and can dry it out.
- Add brown materials: Mix in dry leaves, shredded paper, or cardboard to absorb excess moisture.
- Cover the pile: Use a tarp to protect from rain, but ensure there’s still airflow.
- Create air channels: Use a compost aerator or stick to poke holes in the pile for better drainage and airflow.
- Spread it out: In extreme cases, spread the compost out to dry in the sun before re-piling.
When It’s Too Dry:
- Add water: Use a watering can or hose to moisten the pile evenly as you turn it.
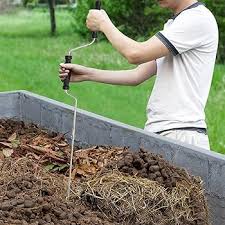
aerating compost
- Add green materials: Fresh grass clippings or food scraps can increase moisture.
- Cover the pile: This helps retain moisture, but ensure it’s not airtight.
Remember, in a crisis scenario, water conservation is crucial. Use greywater or collected rainwater for your compost when possible.
Safety First: What NOT to Compost
In a survival situation, certain materials become even more dangerous to compost:
- Human or pet waste (risk of pathogens)
- Meat or fish scraps (attract pests and can harbor dangerous bacteria)
- Diseased plants (may spread plant pathogens)
- Chemically treated wood products
Troubleshooting Common Composting Problems
- Bad Odors: Usually indicates too much moisture or not enough air. Turn the pile and add brown materials.
- Pests: Cover food scraps with brown materials and ensure the pile is hot enough.
- Slow Decomposition: The pile may be too dry or lack nitrogen. Add water and green materials.
Using Your Compost Safely
Wait until your compost looks like rich, dark soil and smells earthy. In a survival situation, it’s best to use finished compost for non-edible plants or as a soil amendment for trees and shrubs, rather than directly on food crops.
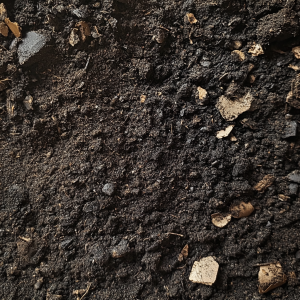
Rich, dark compost dirt
Compost Maturation Time
The time it takes for compost to look like rich, dark soil can vary depending on several factors:
- Pile Size: Larger piles tend to decompose faster due to better heat retention.
- Material Mix: A good balance of greens and browns speeds up the process.
- Particle Size: Smaller particles decompose faster.
- Turning Frequency: Regular turning accelerates decomposition.
- Moisture and Aeration: Proper levels of both are crucial for efficient composting.
- Season: Warmer temperatures generally speed up the process.
Typical Timelines:
- Hot Composting: With optimal conditions and regular turning, you might see finished compost in as little as 1-3 months.
- Cold Composting: This passive method can take 6-12 months or even longer.
- Vermicomposting (with worms): Can produce usable castings in about 3-6 months.
Signs of Mature Compost:
- Dark brown or black color
- Crumbly, soil-like texture
- Earthy, pleasant smell
- Original materials are no longer recognizable
- Temperature has cooled to ambient levels
In a crisis scenario, you might need to use compost before it’s fully mature. While not ideal, partially decomposed compost can still benefit your soil, though it might temporarily tie up some nitrogen as it continues to break down.
Remember, patience is key in composting. Regular monitoring and maintenance will help you achieve rich, dark compost more quickly, providing valuable nutrients for your survival garden.
In a post-societal breakdown scenario, proper composting isn’t just about reducing waste—it’s about protecting your community from disease and ensuring long-term survival. Take it seriously, do it right, and you’ll turn a potential hazard into a valuable resource.