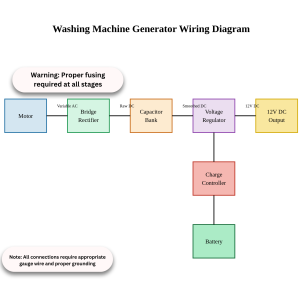
Proper generator wiring diagram for washing machine generator
Making It Safe: Wiring and Voltage Regulation for Your Washing Machine Generator
Remember yesterday when I promised to show you how to make your washing machine generator actually usable without frying your phone or creating an impromptu light show? Well, grab your multimeter, and let’s turn that spinning motor into usable power. Before we dive into the nuts and bolts of this project, let’s talk about what we’re really doing here: we’re taking wild, untamed electricity and teaching it some manners before introducing it to your sensitive electronics.
Think of your washing machine generator’s electrical flow like a wild river that needs to be tamed before it can water your garden. The power coming from your motor is raw and uncontrolled – sometimes a trickle, sometimes a torrent, and about as predictable as a toddler after a candy bar. Our job is to smooth it out into something your devices can drink safely. Just like you wouldn’t drink directly from a mountain stream without filtering it first, you don’t want to feed this raw power straight to your electronics.
Before we get our hands dirty, let’s gather our supplies. You’ll need:
- 35A Bridge Rectifier ($8-15)
- 2200μF Capacitors (2-3 of them) ($5-10)
- Buck Converter/Voltage Regulator rated for at least 30A ($15-25)
- Basic Charge Controller ($20-30)
- Deep Cycle 12V Battery ($60-100)
- Heavy Gauge Wire (10-12 AWG) ($15-20)
- Digital Multimeter ($20-30)
- Fuse Block with appropriate fuses ($10-15)
Now, let’s talk about how this system actually works. The bridge rectifier is your first line of defense – it converts the motor’s AC output into DC, essentially putting a paddle wheel in that wild river to make it flow in one direction. The capacitors act like little reservoirs, smoothing out the power bumps that could otherwise send your electronics into an early retirement. Think of them as shock absorbers for electricity, smoothing out the bumpy ride into a gentle cruise.
Your voltage regulator is the real hero of this story – it’s the control gate ensuring a steady 12V output no matter how fast or slow you’re cranking. Without it, you’d be sending power spikes through your devices that could turn your smartphone into a very expensive paperweight faster than you can say “warranty void.” This is why proper regulation isn’t just important – it’s absolutely crucial for the survival of anything you plan to power with this system.
The assembly process requires attention to detail and a healthy respect for electricity. Start with the motor output processing – connect those motor leads to your bridge rectifier using heavy gauge wire. This isn’t the place to be stingy with wire quality – thin wire here is like trying to drink a milkshake through a coffee stirrer. From there, connect your rectifier’s output to your capacitor bank, wiring the capacitors in parallel. This smoothing circuit is essential for creating usable power that won’t make your devices cry.
The next step is where many DIY generators go wrong – voltage regulation. Your buck converter needs to be properly set up and tested before you even think about connecting any precious electronics. Think of this as the bouncer at the club of clean electricity – nothing gets through without proper credentials. The charge controller comes next, managing power flow to your battery like a responsible adult supervising a teenage party. It prevents overcharging and over-discharging, extending the life of your battery and protecting your entire system.
Testing your setup is crucial, and this isn’t the place to rush. Start by checking voltage at every stage with your multimeter. Begin with low-risk devices like LED bulbs – not your expensive phone or laptop. Monitor for heat at connection points and test under various cranking speeds. Think of it as taking your new generator for a test drive, but on a closed course before hitting the open road.
When it comes to troubleshooting, understanding the symptoms can save you hours of head-scratching. If your output voltage is wobbling around like a rookie tightrope walker, first check those capacitor connections and verify your regulator settings. No output at all? Test that rectifier functionality and make sure your motor is spinning fast enough to generate usable power. A good rule of thumb: if something doesn’t feel right, it probably isn’t.
Maintenance isn’t just a good idea – it’s essential for keeping your system reliable. Every few months, thoroughly inspect your generator setup. Clean all connections like you’re expecting company, check for corrosion like you’re buying a used car, and verify those voltage settings haven’t wandered off on their own adventure. Treat your safety components with extra attention – they’re the only thing standing between your expensive electronics and an early grave.
Remember: This system is only as safe as its weakest component. Don’t be tempted by cheap parts – saving a few dollars on components isn’t worth the risk to your devices or your safety. A proper setup will serve you reliably when you need it most, while a cheap one might leave you in the dark right when things get interesting.
Also remember: measure twice, connect once, and always respect electricity – it’s a lot like my aunt Margaret at family reunions: powerful, unpredictable, and demanding of respect.


